


35%
OFF
GO LOCAL
| Company | Stock | Price |
|---|---|---|


MIKROE-990
28 g
Status:
LightHz Click is a compact add-on board that effectively measures ambient light intensity. This board features the TL2L30BR, a programmable light-to-frequency converter from ams. The sensor outputs either a pulse train or a square wave (50% duty cycle) with a frequency directly proportional to light intensity (irradiance). It has programmable sensitivity and full-scale output frequency and could be used as a rough color detector with a selectable frequency range. This Click board™ makes the perfect solution for the development of applications based on the high-resolution conversion of light intensity to frequency with no external components.
LightHz Click is supported by a mikroSDK compliant library, which includes functions that simplify software development. This Click board™ comes as a fully tested product, ready to be used on a system equipped with the mikroBUS™ socket.
This product is no longer in stock
Availability date:
35%
OFF
| Company | Stock | Price |
|---|---|---|
LightHz Click is based on the TSL230BR, a programmable light-to-frequency converter from ams. It combines a configurable silicon photodiode and a current-to-frequency converter and has a high-resolution conversion of light intensity with no external components. The sensor responds over the 320nm to 1050nm light range and is temperature compensated for the ultraviolet-to-visible light range of 320nm to 700nm. Device sensitivity is selectable in three ranges, providing two decades of adjustment, while the full-scale output frequency can be scaled by one of four preset values with 5% of absolute tolerance.
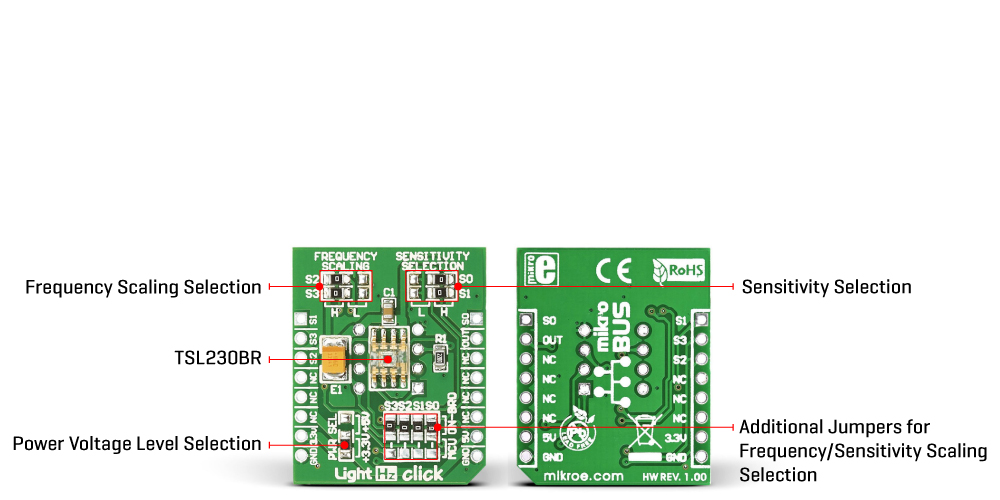
The LightHz Click uses its frequency output to communicate with the host MCU over the OUT pin of the mikroBUS™ socket. The board comes with four SMD jumpers labeled MCU ON-BRD, which allows you to choose the configuration of scaling and sensitivity to be controlled by the host MCU rather than the onboard jumper selection. The latter is set by default.
Using default MCU ON-BRD selection, the sensitivity is controlled by two logic inputs on S0 and S1 on the jumper labeled SENSITIVITY SELECTION. You can choose between 1x, 10, 100x, and power-down options by combining four available positions. The sensitivity of this sensor is adjusted using an electronic iris technique, similar to an aperture control. This way, it is possible to change the device's response to a given amount of light and allows the device to be optimized to a given light level while preserving the output frequency range. The 100x option is set by default.
Using default MCU ON-BRD selection, the output frequency scaling is controlled by two logic inputs on S2 and S3 on the jumper labeled FREQUENCY SCALING. By a combination of four available positions, you can choose between 1, 2, 10, and 100 dividing values. The value 1 means no division as a direct output and is a fixed-pulse-width pulse train. The higher divider means lower frequency ranges for high-resolution measurement; the 100 value is set by default.
If your choice is to control the sensor by the host MCU by selecting the MCU ON-BRD jumpers to MCU, then the logic inputs for scaling and selection become available on the S0, S1, S2, and S3 pins of the mikroBUS™ socket. The combination tables are in our documentation section below.
This Click board™ can operate with either 3.3V or 5V logic voltage levels selected via the PWR SEL jumper. This way, both 3.3V and 5V capable MCUs can use the communication lines properly. However, the Click board™ comes equipped with a library containing easy-to-use functions and an example code that can be used, as a reference, for further development.
Type
Optical
Applications
Can be used for the development of applications based on the high-resolution conversion of light intensity to the frequency with no external components
On-board modules
TL2L30BR - programmable light-to-frequency converter from ams
Key Features
Absolute output frequency tolerance of 5%, all inputs, and the output are TTL compatible, four selectable options for sensitivity, four selectable options for scaling the frequency, a pulse train, or a square wave as an output, and more
Interface
GPIO
Feature
No ClickID
Compatibility
mikroBUS™
Click board size
S (28.6 x 25.4 mm)
Input Voltage
3.3V or 5V
This table shows how the pinout on LightHz Click corresponds to the pinout on the mikroBUS™ socket (the latter shown in the two middle columns).
| Notes | Pin | Pin | Notes | ||||
|---|---|---|---|---|---|---|---|
| S1 Logic Input | S1 | 1 | AN | PWM | 16 | S0 | S0 Logic Input |
| S3 Logic Input | S3 | 2 | RST | INT | 15 | OUT | Frequency Output |
| S2 Logic Input | S2 | 3 | CS | RX | 14 | NC | |
| NC | 4 | SCK | TX | 13 | NC | ||
| NC | 5 | MISO | SCL | 12 | NC | ||
| NC | 6 | MOSI | SDA | 11 | NC | ||
| Power Supply | 3.3V | 7 | 3.3V | 5V | 10 | 5V | Power Supply |
| Ground | GND | 8 | GND | GND | 9 | GND | Ground |
| Label | Name | Default | Description |
|---|---|---|---|
| - | PWR SEL | Down | Power Voltage Level Selection 3V3/5V: Up position 5V, Down position 3V3 |
| S0-S3 SEL | MCU ON-BRD | Upper | Additional Jumpers for Frequency/Sensitivity Scaling Selection MCU/ON-BRD: Upper position ON-BRD, Lowerposition MCU |
| S0-S1 | SENSITIVITY SELECTION | Right | Sensitivity Selection L/H: Left position L, Right position H |
| S2-S3 | FREQUENCY SCALING | Left | Frequency Scaling Selection L/H: Left position H, Right position L |
| Description | Min | Typ | Max | Unit |
|---|---|---|---|---|
| Supply Voltage | 3.3 | - | 5 | V |
| Light Range | 320 | - | 1050 | nm |
| Wavelength | - | 640 | - | nm |
We provide a library for the LightHz Click as well as a demo application (example), developed using MIKROE compilers. The demo can run on all the main MIKROE development boards.
Package can be downloaded/installed directly from NECTO Studio Package Manager (recommended), downloaded from our LibStock™ or found on MIKROE github account.
Library Description
This library contains API for LightHz Click driver.
Key functions
lighthz_set_sensitivity This function sets the sensor sensitivity.
lighthz_set_frequency_scaling This function sets the sensor frequency scaling.
lighthz_get_freq_pin This function returns the freq pin logic state.
Example Description
This example demonstrates the use of LightHz Click by measuring and displaying the frequency of clock output signal. The higher the light intensity the higher the frequency.
void application_task ( void )
 {
     uint32_t freq_cnt = 0;
     uint16_t sample_cnt = 0;

     // Wait for the clock rising edge signal
     while ( !hal_ll_gpio_read_pin_input( &lighthz.freq.pin ) );

     // A loop for measuring the clock frequency counts. It's not an ideal implementation.
     // Here we should use an external interrupt on the clock pin rising edge and a timer interrupt
     // for the best accuracy, however, those interrupt features have not yet been implemented in the SDK.
     while ( ( sample_cnt < LIGHTHZ_SAMPLE_COUNTS ) && ( freq_cnt < LIGHTHZ_MAX_COUNTS_PER_S ) )
     {
         // A single iteration in the loops below should take as close to 10us as possible
         // So to improve the measurement accuracy adjust the delay below for your system
         while ( hal_ll_gpio_read_pin_input( &lighthz.freq.pin ) )
         {
             freq_cnt++;
             Delay_us ( LIGHTHZ_DELAY_US );
         }
         while ( !hal_ll_gpio_read_pin_input( &lighthz.freq.pin ) )
         {
             freq_cnt++;
             Delay_us ( LIGHTHZ_DELAY_US );
         }
         sample_cnt++;
     }
     freq_cnt /= sample_cnt;

     // The higher the light intensity the higher the frequency.
     log_printf( &logger, " Frequency: %.1f Hzrnn", ( float ) LIGHTHZ_MAX_COUNTS_PER_S / freq_cnt );

     Delay_ms ( 1000 );
 }
The full application code, and ready to use projects can be installed directly from NECTO Studio Package Manager (recommended), downloaded from our LibStock™ or found on MIKROE github account.
Other MIKROE Libraries used in the example:
Additional notes and informations
Depending on the development board you are using, you may need USB UART click, USB UART 2 Click or RS232 Click to connect to your PC, for development systems with no UART to USB interface available on the board. UART terminal is available in all MIKROE compilers.
This Click board™ is supported with mikroSDK - MIKROE Software Development Kit. To ensure proper operation of mikroSDK compliant Click board™ demo applications, mikroSDK should be downloaded from the LibStock and installed for the compiler you are using.
For more information about mikroSDK, visit the official page.
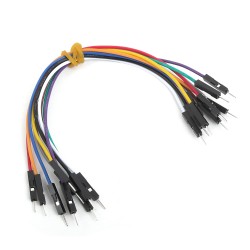
NOTE: Please be advised that any peripheral devices or accessories shown connected to the Click board™ are not included in the package. Check their availability in our shop or in the YMAN section below.

$889.00

$95.00

$549.00

$299.00
$29.00
$29.00
$6.59
$3.60

$119.00

$299.00
$449.00
$349.00
$349.00
$349.00
$269.00
$249.00

$209.00
