OFF
GO LOCAL
| Company | Stock | Price |
|---|---|---|

MIKROE-1901
24 g
Status:
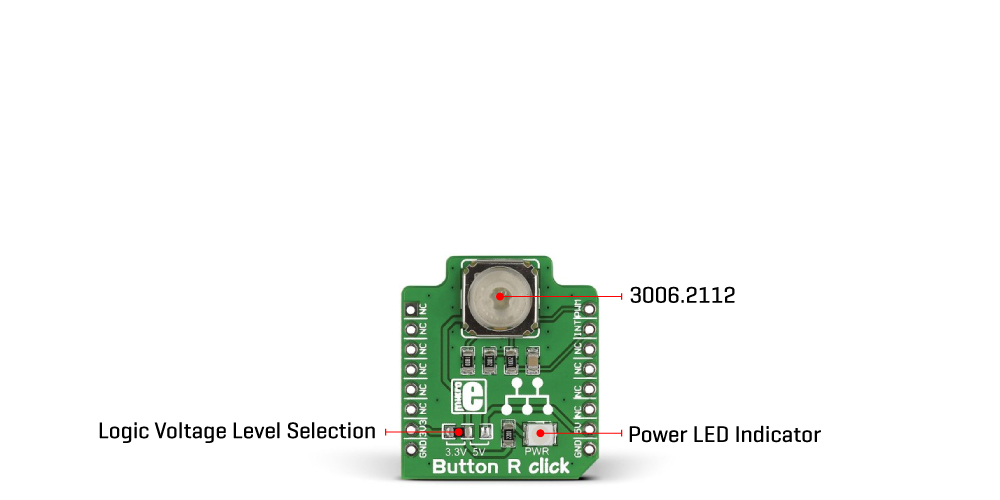
Button R Click is a compact add-on board equipped with a tactile switch, sometimes called a push button, making it the simplest solution for adding a single push button to your design. This board features the 3006.2112, a tactile switch with integrated independent red LED from Marquardt. It provides a user interface tactile feel with visual feedback, where the integrated LED can be controlled separately with various visual presentation patterns. This Click board™ makes the perfect solution for many different low-power electronic applications, such as various control boards, user input keys, activators of certain functions with built-in signalization, and more.
Button R Click is supported by a mikroSDK compliant library, which includes functions that simplify software development. This Click board™ comes as a fully tested product, ready to be used on a system equipped with the mikroBUS™ socket.
This product is no longer in stock
Availability date:
OFF
| Company | Stock | Price |
|---|---|---|

Button R Click is based on the 3006.2112, a tactile switch with integrated independent red LED from Marquardt. The tactile switch has a debounce circuit to eliminate the ripple signal and provide a clean transition at its output and is pulled down. The round transparent button of the tactile switch is 6.8mm in diameter and has a red LED background light. This LED can be programmed as feedback to the user to make a visual expression of knowing the contact has been made. Since the backlight LED is controlled independently, it can be programmed in different patterns, such as varying light levels, light intensity, or blinking rate on subsequent button presses, thus giving additional feedback to the end user.

The tactile button of this Click board™ sends an interrupt signal to the host MCU using the INT pin of the mikroBUS™ socket. The host MCU can control the integrated red LED using the PWM pin of the mikroBUS™ socket. The Pulse Width Modulation (PWM) lets you program this LED using various blinking patterns and light intensity.
This Click board™ can operate with either 3.3V or 5V logic voltage levels selected via an onboard jumper. This way, both 3.3V and 5V capable MCUs can use the communication lines properly. However, the Click board™ comes equipped with a library containing easy-to-use functions and an example code that can be used, as a reference, for further development.
Type
Pushbutton/Switches
Applications
Can be used for many different low power electronic applications, such as various control boards, user input keys, activators of certain functions with built-in signalization, and more
On-board modules
3006.2112 - tactile switch with integrated independent red LED from Marquardt
Key Features
Excellent mechanical endurance, integrated red LED with adjustable brightness, very low ON resistance, comes equipped with the debouncing circuit, and more
Interface
PWM
Feature
No ClickID
Compatibility
mikroBUS™
Click board size
S (28.6 x 25.4 mm)
Input Voltage
3.3V or 5V
This table shows how the pinout on Button R Click corresponds to the pinout on the mikroBUS™ socket (the latter shown in the two middle columns).
| Label | Name | Default | Description |
|---|---|---|---|
| LD1 | PWR | - | Power LED Indicator |
| JP1 | - | Left | Logic Level Voltage Selection 3V3/5V: Left position 3V3, Right position 5V |
| Description | Min | Typ | Max | Unit |
|---|---|---|---|---|
| Supply Voltage | 3.3 | - | 5 | V |
We provide a library for the Button R Click as well as a demo application (example), developed using Mikroe compilers. The demo can run on all the main Mikroe development boards.
Package can be downloaded/installed directly from NECTO Studio Package Manager (recommended), downloaded from our LibStock™ or found on Mikroe github account.
Library Description
This library contains API for Button R Click driver.
Key functions
buttonr_pwm_stop This function stops the PWM moudle output.
buttonr_pwm_start This function starts the PWM moudle output.
buttonr_get_button_state This function reads the digital signal from the INT pin which tells us whether the button has been pressed or not.
Example Description
This example showcases how to initialize and use the whole family of Button R clicks. One library is used for every single one of them. They are simple touch detectors which send a pressed/released signal and receive a PWM output which controls the backlight on the button.
 void application_task ( void ) {
     button_state = buttonr_get_button_state( &buttonr );
     if ( button_state && ( button_state != button_state_old ) ) {
         backligh_off( );
         button_state_old = button_state;
         Delay_ms( 500 );
     } else if ( !button_state && ( button_state != button_state_old ) ) {
         backlight_on( );
         button_state_old = button_state;
         Delay_ms( 500 );
     }
 }
The full application code, and ready to use projects can be installed directly from NECTO Studio Package Manager (recommended), downloaded from our LibStock™ or found on Mikroe github account.
Other Mikroe Libraries used in the example:
Additional notes and informations
Depending on the development board you are using, you may need USB UART click, USB UART 2 Click or RS232 Click to connect to your PC, for development systems with no UART to USB interface available on the board. UART terminal is available in all Mikroe compilers.
This Click board™ is supported with mikroSDK - Mikroe Software Development Kit. To ensure proper operation of mikroSDK compliant Click board™ demo applications, mikroSDK should be downloaded from the LibStock and installed for the compiler you are using.
For more information about mikroSDK, visit the official page.
NOTE: Please be advised that any peripheral devices or accessories shown connected to the Click board™ are not included in the package. Check their availability in our shop or in the YMAN section below.