


The Hexiwear Docking Station is an expansion board for Hexiwear, the wearable IoT development kit. It provides an interface for programming, debugging, and enhancing Hexiwear with additional functionalities (by adding click boards™).
Hexiwear
Hexiwear is a standalone development kit for IoT, designed to look and feel like a consumer-grade device. Consult the Hexiwear user guide for a detailed overview.
Features
Every feature of the Docking Station is intended to either expand Hexiwear's functionality or to provide an interface for changing and debugging its firmware. The two most important features are the three mikroBUS™ sockets, and the OpenSDA circuitry that allows you to program/debug Hexiwear through USB.
What's on board
The majority of components are on the front side.
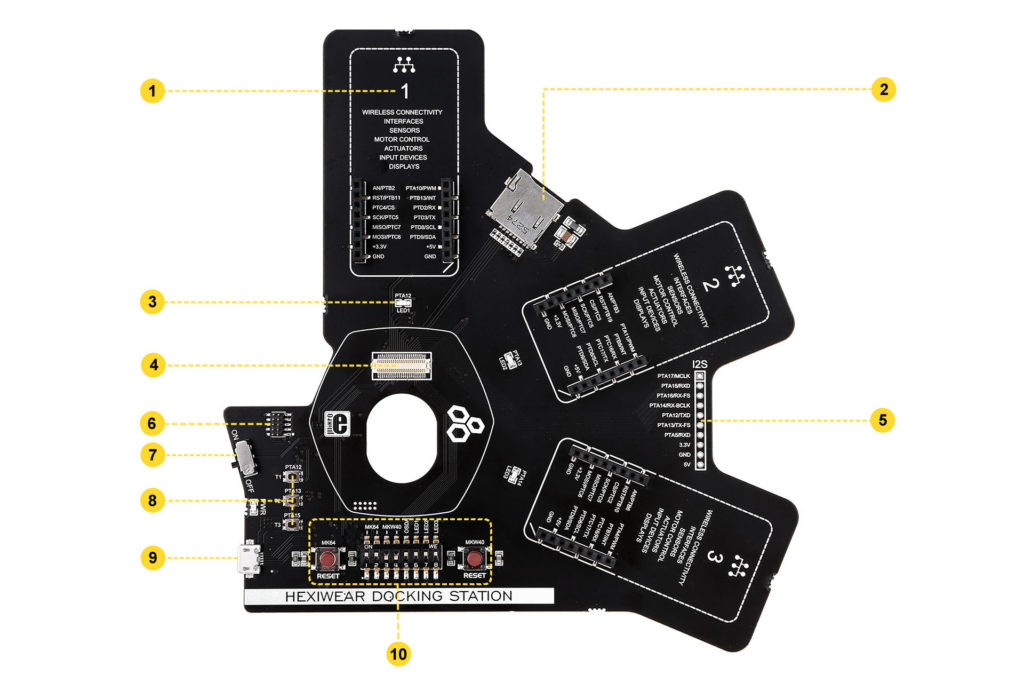
- mikroBUS™ socket for click boards™ (one of three)
- microSD slot (card not included)
- LED (one of three)
- Hexiwear connector that interfaces to Hexiwear's main MCU (K64x) and Wireless MCU (KW4x)
- I2S interface
- JTAG connector for external programmers
- ON/OFF switch
- Pushbuttons
- Micro USB port
- OpenSDA control interface
The OpenSDA programmer/debugger circuitry in on the rear of the board:

Buttons and switches close-up

There is a row of 8 configuration switches right under the Hexiwear connector. Switches 1-5 are for setting up the OpenSDA programmer/debugger to connect either to the K64 MCU or the KW4x BLE MCU.
In both cases, switch 5 should be set in the upper position (ON). The configuration in the image above is for programming and debugging K64 (switches 1,2 and 5 in the upper position, while 3 and 4 are in lower position). To program and debug KW4x, put switches 1 and 2 into the lower position, and switches 3-5 in the upper position.
To use the Docking station with an external programmer (through the JTAG connector), switch 5 should be in lower position.
The remaining switches (6-8) are for choosing whether PTA12, PTA13 and PTA14 pins are connected to the Docking Station LEDs (the pins can also be used as GPIOs (refer to the schematic to see how specific pins are routed).
Schematic

The Hexiwar Docking Station schematic is available as a printable PDF file
click boards


The click board eco-system vastly enhances Hexiwear's potential as a development tool. Hundreds of sensors, actuators, transceivers, displays, ports, encoders and interfaces are available on click boards – add-on boards with a standardized connector and form factor.
See all available click boards™ on MikroElektronika's website.
OpenSDA
OpenSDA is an open-standard serial and debug adapter. It bridges serial and debug communications between a USB host and a target board microcontroller (K64 and KW4x in case of Hexiwear). The hardware circuit is based on NXP Kinetis K20 family MCU and an integrated USB controller. OpenSDA features a mass storage device (MSD) bootloader.
Learn more in the official user guide.
Troubleshooting
Docking station appears as “MAINTENANCE” when connected to PC
If you have connected the Docking station to your PC, and it appears as “MAINTENANCE” without holding RESET button while turning the Docking station on, there are two possible reasons why this is happening.
I) First is that you somehow erased, or corrupted “DAPLINK” OpenSDA firmware, and you
can easily load the firmware again, just follow nex steps:
-Download hex file of the firmware from the following link:
https://github.com/MikroElektronika/HEXIWEAR/tree/master/HW/HEXIWEAR_DockingStation
-Just copy it to the “MAINTENACE” mass storage.
II) Second possible reason is that you somehow erased, or corrupted one of the MCUs that is turned on on the DIP switch on the Docking station at the moment. This is happening because if your Hexiwear’s MCU is empty, the docking station with the Hexiwear on it would appear in “MAINTENANCE” mode.
What you should do is this (In case that MK64 is erased):
Turn off all switches on the Docking station except of the OSDA, which needs to be turned on. Connect the Docking station with Hexiwear on it to your PC and then turn the Docking station on.
While the Docking station itself is turned on, put the MK64 switches in the ON possition, and use our mikroProg suite for ARM to write this bin file to Hexiwear’s MCU:
https://github.com/MikroElektronika/HEXIWEAR/blob/master/SW/binaries/HEXIWEAR_MK64.bin
mikroProg suite can be downloaded from here:
This is how mikroProg suite needs to be set in order to program the Hexiwear:

Note that you will have to install mbed serial driver for your Docking station. If you didn’t already do that, you can download drivers from here:
https://developer.mbed.org/handbook/Windows-serial-configuration