


The ESP32 microcontroller is a favorite among electronics enthusiasts. Its versatility and power make it ideal for many projects.
Understanding its pin configuration is crucial for unlocking its full potential.
With 34 GPIO pins, the ESP32 offers a wide range of functions. These include input, output, and specialized tasks like ADC and PWM.
Proper pin mapping ensures your projects run smoothly and efficiently.
This guide will help you navigate the complexities of ESP32 pin configuration, making your projects more successful.
Overview of ESP32 and Its Pinout
The ESP32 is a powerhouse microcontroller widely used in IoT and embedded systems. It combines a dual-core processor with Wi-Fi and Bluetooth, enhancing its versatility.
A clear understanding of its pinout is crucial for successful project implementation. The ESP32 provides 34 GPIO pins available for diverse functions.
Here's a quick summary of key features:
- Dual-core processor
- Wi-Fi and Bluetooth capabilities
- 34 GPIO pins for varied usage
Knowing these features can help you better plan and execute projects with the ESP32.
Understanding ESP32 Pin Mapping
Pin mapping is vital to use the ESP32 effectively. It ensures accurate connection of peripherals to the correct pins. Correct pin mapping can prevent mishaps and improve project efficiency.
ESP32's pin mapping is flexible, allowing for custom configurations using the GPIO matrix. This feature lets you assign almost any peripheral function to any GPIO pin. Proper use of pin mapping ensures optimized performance and reliability.
Key aspects of ESP32 pin mapping include:
- Flexible GPIO assignments
- Custom configurations via GPIO matrix
- Optimized connection of peripherals
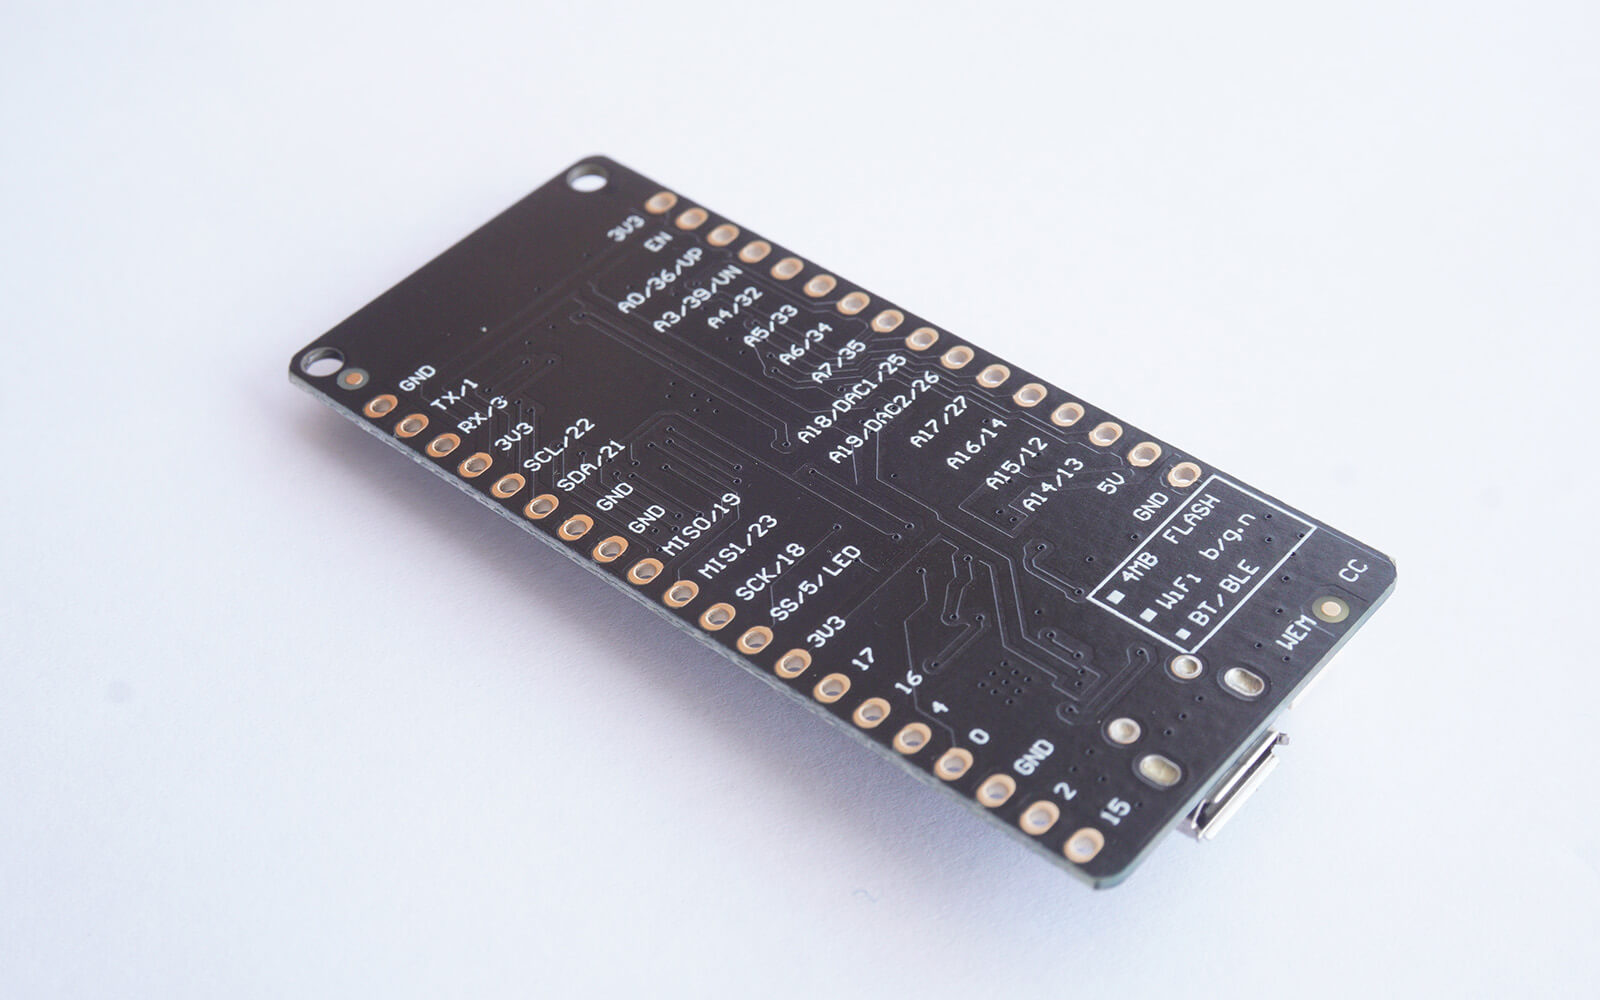
Types of ESP32 Pins and Their Functions
ESP32 comes with a variety of pins, each serving unique functions. Understanding these pins is key to effective use.
The ESP32 has 34 GPIO pins that you can configure as input, output, or both. Some pins are designated for specific roles, like ADC, DAC, or PWM.
Here's a quick rundown of ESP32 pin types:
- GPIO Pins: Versatile and used for general-purpose input/output
- Special Function Pins: Dedicated to tasks like communication
- Power Pins: Provide power supply options
Input-Only Pins
Certain GPIO pins on the ESP32 are restricted to input functions. These pins cannot send signals but are excellent for receiving them.
Input-only pins are reliable for sensor data collection. They are crucial in projects requiring precise input readings.
Common input-only pins include:
- GPIO34
- GPIO35
- GPIO36
Strapping Pins and Boot Behavior
Strapping pins impact the boot settings of the ESP32. They define the device’s startup configuration and should be handled with care.
Incorrect use can alter boot mode, affecting performance. They play a crucial role in determining startup behavior.
Important strapping pins to consider:
- GPIO0
- GPIO2
- GPIO15
Special Pin Functions
ESP32 features several pins with specialized functionalities. These pins extend the device’s capabilities beyond basic input and output operations. Understanding these features is essential to leveraging the full potential of the ESP32. Each pin function is tailored for specific purposes, enhancing the microcontroller’s versatility.
Key special functions include ADC, DAC, and touch sensing, among others. Using these features properly can enhance project efficiency and output. Remember to consider pin assignments and functionalities before starting your design.
Common special functions:
- ADC: Converts analog signals to digital values
- DAC: Converts digital data to analog signals
Additional functions:
- PWM: Modulates width for signals
- I2C/SPI: Handles serial communication
Analog to Digital Converter (ADC) Pins
ADC pins allow the ESP32 to read analog inputs. This is useful for sensor data that isn't strictly digital.
They provide up to 12-bit resolution, perfect for precision applications. ADC pins are vital in projects needing analog input.
Common ADC pins include:
- GPIO32
- GPIO33
- GPIO34
Digital to Analog Converter (DAC) Pins
DAC pins enable analog output from digital data. They are ideal for applications like audio signal processing.
With two DAC channels, the ESP32 can output various waveforms or signals. This function can enhance audio projects.
Key DAC pins:
- GPIO25
- GPIO26
Capacitive Touch Pins
Capacitive touch pins on the ESP32 simplify touch sensing. Useful for creating touch-sensitive interfaces.
These pins detect changes in capacitance when touched. This feature allows easy implementation of touch controls.
Touch pins include:
- GPIO4
- GPIO0
- GPIO2
Communication Interfaces on ESP32 Pins
ESP32’s communication interfaces are crucial for connecting with other devices. These interfaces manage data transfer between the ESP32 and external components.
Understanding these interfaces is essential for effectively using your ESP32. They facilitate both simple and complex communication needs across various projects.
Main interfaces support serial and synchronous communication. This flexibility makes the ESP32 ideal for IoT applications.
Common interfaces:
- I2C
- SPI
- UART
Interface functions:
- Handle data transfer
- Enable multi-device communication
I2C, SPI, and UART Pin Configuration
I2C is a two-wire protocol ideal for low-speed device communication. Its simplicity and reliability make it popular.
SPI provides fast data transfer, useful for connecting high-speed peripherals like displays. Each protocol has specific configurations for effective use. Proper setup ensures reliable communications.
Key I2C pins:
- GPIO21: SDA
- GPIO22: SCL
Essential SPI pins:
- GPIO18: SCK
- GPIO19: MISO
PWM, Interrupts, and RTC GPIOs
ESP32's PWM pins manage tasks like motor control and LED brightness modulation. They offer high-frequency pulse generation essential for precise control.
Interrupt pins enable quick responses to external events. These pins detect state changes promptly, crucial for event-driven applications.
RTC GPIOs are used for maintaining accurate time. They allow for efficient power management in devices requiring real-time clocks.
Key functions include:
- PWM: Pulse width modulation
- Interrupts: Event handling
- RTC GPIOs: Timekeeping and low-power operation
Best Practices for ESP32 Pin Configuration
Configuring ESP32 pins correctly is vital for robust performance. Consistency in pin usage supports reliable connections and operation.
Always double-check pin assignments before powering your project. This minimizes potential conflicts and ensures an easy setup process.
Here are a few best practices to consider:
- Use dedicated pins for specific functions.
- Employ internal pull-up and pull-down resistors wisely.
- Keep track of changes with thorough documentation.
Common Pitfalls and Troubleshooting Tips
Misconfiguring pins is a frequent error that can lead to unexpected behavior. Careful examination can prevent these issues from arising.
Avoid overlooking power supply requirements. Insufficient power can cause erratic ESP32 behavior, affecting pin performance.
If problems persist, consider these troubleshooting steps:
- Check pin mappings and ensure they match the schematic.
- Review code for errors in pin definition.
- Use a multimeter to verify electrical connections.
Conclusion and Further Resources
Mastering ESP32 pin configuration enhances your project's efficiency. Understanding pin capabilities ensures optimal microcontroller use.
Explore official ESP32 documentation for more details. Online forums and community guides offer valuable insights. Stay informed to fully leverage your ESP32 board's potential.
Note: This guide is intended as a general overview for typical ESP32-WROOM-32 boards. Pin functions may vary slightly between ESP32 variants (e.g., S2, S3, C3) or custom hardware. For detailed electrical specs and design constraints, always consult the official Espressif documentation.
Espressif Click Boards in Action: Explore Products & Real-World Projects
Curious how Espressif technology fuels the next generation of IoT innovation? You're in the right place.
Browse a curated range of Click boards™ created in collaboration with Espressif - featuring Wi-Fi, Bluetooth, and cloud-ready modules designed for easy integration. These compact, dependable boards make it simple to harness Espressif's powerful wireless solutions for your next project. Each board is engineered for fast prototyping and easy integration into connected designs.


See Them in Action on EmbeddedWiki
Want to see these boards powering real-world builds? Head over to EmbeddedWiki to explore practical, hands-on applications. Engineers and developers are using Espressif-based Click boards to create smart devices, streamline automation, and bring connected projects to life.
Whether you're looking to kickstart your own project or need a guide to follow, you're only one click away from inspiration.
ABOUT MIKROE
MIKROE is committed to changing the embedded electronics industry through the use of time-saving industry-standard hardware and software solutions. With unique concepts like Remote Access, One New Product/Day, Multi-Architectural IDE and most recently, the EmbeddedWiki™ platform with more than million ready-for-use projects, MIKROE combines its dev boards, compilers, smart displays, programmers/debuggers and 1850+ Click peripheral boards to dramatically cut development time. mikroBUS™; mikroSDK™; SiBRAIN™ and DISCON™ are open standards and mikroBUS only has been adopted by over 100 leading microcontroller companies and integrated on their development boards.
Your MIKROE


