


35%
OFF
GO LOCAL
| Company | Stock | Price |
|---|---|---|


MIKROE-1506
32 g
Status:
Joystick Click is a compact add-on board representing a smart navigation key concept based on contactless magnetic movement detection. This board features AS5013 and N50P105, a miniature magnetic joystick module, and a complete hall sensor IC both from ams AG. The two-dimensional linear encoder AS5013, mounted on the bottom side of this Click board™, includes five integrated Hall sensing elements and monitors the movement of the magnet incorporated into the knob providing the X and Y coordinates through an I2C interface. Also, an integrated mechanical push button built in the N50P105 module provides a “select” function. This Click board™ is suitable for numerous applications as a human-machine interface device (HMI), analog joysticks (360 degrees), remote controls, and more.
Joystick Click is supported by a mikroSDK compliant library, which includes functions that simplify software development. This Click board™ comes as a fully tested product, ready to be used on a system equipped with the mikroBUS™ socket.
NOTE: Available for purchase while supplies last. Please contact Sales department to inquire about minimum order quantities (MOQ) and lead times.
This product is no longer in stock
Availability date:
35%
OFF
| Company | Stock | Price |
|---|---|---|
Joystick Click is based on the AS5013 and N50P105, a miniature magnetic joystick module, and a complete hall sensor IC both from ams AG. The N50P105 represents a smart navigation key concept based on contactless magnetic movement detection. That's precisely why this Click board™ is characterized by high reliability due to magnetic contact-less sensing. On the other hand, the two-dimensional linear encoder AS5013, mounted on `into the joystick and directly provides the X and Y coordinates through an I2C interface, thus forming a high-quality joystick.
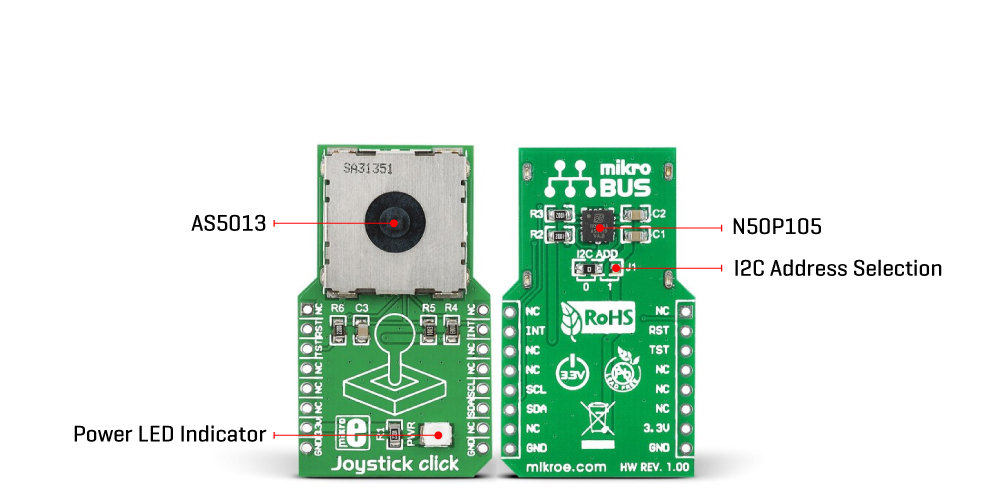
The AS5013 includes five integrated Hall sensing elements for detecting up to ±2mm lateral displacement, high-resolution ADC, XY coordinate, and motion detection engine combined with a smart power management controller. The X and Y positions coordinates and magnetic field information for each Hall sensor element are transmitted over a 2-wire I2C compliant interface to the host MCU with a maximum clock frequency of 3.4MHz. Also, the AS5013 allows choosing the least significant bit (LSB) of its I2C slave address using the SMD jumper labeled I2C ADD.
Also, an additional feature of this board represents an integrated mechanical push button built into the N50P105 joystick providing a “Select” function that can be digitally tracked via the CS pin on the mikroBUS™ socket marked as TST. Alongside its interrupt feature routed to the INT pin of the mikroBUS™ socket, the AS5013 also provides an active-low Reset function routed to the RST pin on the mikroBUS™ socket.
This Click board™ can be operated only with a 3.3V logic voltage level. The board must perform appropriate logic voltage level conversion before using MCUs with different logic levels. However, the Click board™ comes equipped with a library containing functions and an example code that can be used, as a reference, for further development.
Type
Pushbutton/Switches
Applications
Can be used for numerous applications as a human-machine interface device (HMI), analog joysticks (360 degrees), remote controls, and more
On-board modules
AS5013 and N50P105 - miniature magnetic joystick module and a Hall sensor from ams AG
Key Features
Lateral magnet movement radius up to ±2mm, direct knob force feedback, low power consumption, I2C interface, Select function, high reliability, easy-to-use, and more
Interface
I2C
Feature
No ClickID
Compatibility
mikroBUS™
Click board size
M (42.9 x 25.4 mm)
Input Voltage
3.3V
This table shows how the pinout on Joystick Click corresponds to the pinout on the mikroBUS™ socket (the latter shown in the two middle columns).
| Notes | Pin | Pin | Notes | ||||
|---|---|---|---|---|---|---|---|
| NC | 1 | AN | PWM | 16 | NC | ||
| Reset | RST | 2 | RST | INT | 15 | INT | Interrupt |
| Pushbutton Detection | TST | 3 | CS | RX | 14 | NC | |
| NC | 4 | SCK | TX | 13 | NC | ||
| NC | 5 | MISO | SCL | 12 | SCL | I2C Clock | |
| NC | 6 | MOSI | SDA | 11 | SDA | I2C Data | |
| Power Supply | 3.3V | 7 | 3.3V | 5V | 10 | NC | |
| Ground | GND | 8 | GND | GND | 9 | GND | Ground |
| Label | Name | Default | Description |
|---|---|---|---|
| LD1 | PWR | - | Power LED Indicator |
| JP1 | I2C ADD | Left | I2C Address Selection 0/1: Left position 0, Right position 1 |
| Description | Min | Typ | Max | Unit |
|---|---|---|---|---|
| Supply Voltage | - | 3.3 | - | V |
| Contact Resistance of Dome Switch | - | - | 500 | mOM |
| Dielectric Withstanding Voltage | 100 | - | - | VAC |
| Operating Life (Each Direction) | 1.000.000 | - | - | Cycles |
| Operating Temperature Range | -20 | +25 | +70 | °C |
We provide a library for the Joystick Click as well as a demo application (example), developed using MikroElektronika compilers. The demo can run on all the main MikroElektronika development boards.
Package can be downloaded/installed directly from NECTO Studio Package Manager(recommended way), downloaded from our LibStock™ or found on Mikroe github account.
Library Description
This library contains API for Joystick Click driver.
Key functions
Get joystick position function
Get state of Joystick button function
General soft reset function
Example Description
This application configures and enables use of the joystick.
 void application_task ( void )
 {
     //  Task implementation.

     button_state = joystick_press_button( &joystick );

     position = joystick_get_position( &joystick );

     Delay_10ms( );

     if ( ( button_state == 1 ) && ( button_state_old == 0 ) )
     {
         button_state_old = 1;

         log_printf( &logger, "  Button is pressed rn" );
         log_printf( &logger, "*********************rn" );
     }

     if ( ( button_state == 0 ) && ( button_state_old == 1 ) )
     {
         button_state_old = 0;
     }

     if ( position_old != position )
     {
         switch ( position )
         {
             case 0 :
             {
                 log_printf( &logger,"    Start position    rn" );
                 break;
             }
             case 1 :
             {
                 log_printf( &logger, "         Top    rn" );
                 break;
             }
             case 2 :
             {
                 log_printf( &logger, "      Top-Right    rn" );
                 break;
             }
             case 3 :
             {
                 log_printf( &logger, "        Right    rn" );
                 break;
             }
             case 4 :
             {
                 log_printf( &logger, "     Bottom-Right    rn" );
                 break;
             }
             case 5 :
             {
                 log_printf( &logger, "        Bottom    rn" );
                 break;
             }
             case 6 :
             {
                 log_printf( &logger, "     Bottom-Left    rn" );
                 break;
             }
             case 7 :
             {
                 log_printf( &logger, "         Left    rn" );
                 break;
             }
             case 8 :
             {
                 log_printf( &logger, "       Top-Left    rn" );
                 break;
             }
         }

         log_printf( &logger, "*********************rn" );

         position_old = position;

         Delay_100ms();
     }
 }
The full application code, and ready to use projects can be installed directly from NECTO Studio Package Manager(recommended way), downloaded from our LibStock™ or found on Mikroe github account.
Other Mikroe Libraries used in the example:
Additional notes and informations
Depending on the development board you are using, you may need USB UART click, USB UART 2 Click or RS232 Click to connect to your PC, for development systems with no UART to USB interface available on the board. UART terminal is available in all MikroElektronika compilers.
This Click board™ is supported with mikroSDK - MikroElektronika Software Development Kit. To ensure proper operation of mikroSDK compliant Click board™ demo applications, mikroSDK should be downloaded from the LibStock and installed for the compiler you are using.
For more information about mikroSDK, visit the official page.
NOTE: Please be advised that any peripheral devices or accessories shown connected to the Click board™ are not included in the package. Check their availability in our shop or in the YMAN section below.

$889.00

$95.00

$549.00

$299.00
$29.00
$29.00
$3.30
$3.60

$119.00
$349.00
$349.00

$299.00
$449.00
$349.00
$269.00
$249.00

$209.00
