MikroElektronika white logo
  • Products
    • Click Boards
      • Wireless Connectivity
        • GPS/GNSS
        • GSM/LTE
        • LTE IoT
        • BT/BLE
        • WiFi
        • RFID/NFC
        • GSM+GPS
        • 6LoWPAN
        • ZigBee
        • UWB
        • SigFox
        • Sub-1 GHz Transceievers
        • 2.4 GHz Trancevers
        • LoRa
        • WiFi+BLE
      • Sensors
        • Biometrics
        • Gas
        • Magnetic
        • Motion
        • Optical
        • Pressure
        • Proximity
        • Temperature & humidity
        • Current sensor
        • Miscellaneous
        • Environmental
        • Force
        • Inductance
        • RF meter
        • Click Shields
        • Click Bundles
      • Interface
        • Adapter
        • CAN
        • Port expander
        • RS485
        • USB
        • 1-Wire
        • RS232
        • Ethernet
        • LIN
        • PWM
        • Current
        • DALI
        • I2C
        • Fiber optics
        • SPI
        • DMX
        • CXPI
        • Click Shields
        • Click Bundles
      • Display & LED
        • LED Drivers
        • LED Matrix
        • LED Segment
        • OLED
        • LCD
        • TFT
        • Click Shields
        • Click Bundles
      • Miscellaneous
        • Relay
        • Optocoupler
        • ID
        • Proto
        • Encryption
        • Click Shields
        • Click Bundles
      • Mixed Signal
        • ADC
        • Measurements
        • DAC
        • Digital potentiometer
        • ADC-DAC
        • Click Shields
        • Click Bundles
      • Storage
        • EEPROM
        • FLASH
        • FRAM
        • microSD
        • MRAM
        • SRAM
        • EERAM
        • ReRAM
        • DRAM
        • Click Shields
        • Click Bundles
      • Motor Control
        • Brushed
        • Brushless
        • Servo
        • Stepper
        • Click Shields
        • Click Bundles
      • Audio & Voice
        • Amplifier
        • Microphone
        • Speakers
        • Signal Processing
        • Speech recognition
        • FM
        • MP3
        • Click Shields
        • Click Bundles
      • HMI
        • Capacitive
        • Pushbutton/Switches
        • Potentiometers
        • Rotary encoder
        • Haptic
        • Fingerprint
        • Click Shields
        • Click Bundles
      • Clock & Timing
        • RTC
        • Clock generator
        • Click Shields
        • Click Bundles
      • Power Management
        • Battery charger
        • Boost
        • Buck
        • Linear
        • Buck-Boost
        • Wireless Charging
        • Power Switch
        • USB-C PD
        • Click Shields
        • Click Bundles
      • Click Bundles
      • Click Shields
    • NECTO
      • NECTO Studio
    • Compilers
      • PIC
        • C
          • NECTO Studio
          • mikroC PRO for PIC
        • Basic
          • mikroBasic PRO for PIC
        • Pascal
          • mikroPascal PRO for PIC
        • Additional Software
          • CODEGRIP WiFi license
          • CODEGRIP SSL license
          • Visual TFT
          • Visual TFT AI
          • Visual GLCD
          • Package Manager
          • mikroBootloader
          • CAN calculator
          • GLCD Font Creator
          • Timer Calculator
          • MikroPlot
      • dsPIC/PIC24
        • C
          • NECTO Studio
          • mikroC PRO for dsPIC
        • Basic
          • mikroBasic PRO for dsPIC
        • Pascal
          • mikroPascal PRO for dsPIC
        • Additional Software
          • CODEGRIP WiFi license
          • CODEGRIP SSL license
          • Visual TFT
          • Visual GLCD
          • Package Manager
          • mikroBootloader
          • CAN calculator
          • GLCD Font Creator
          • Timer Calculator
          • MikroPlot
      • PIC32
        • C
          • NECTO Studio
          • mikroC PRO for PIC32
        • Basic
          • mikroBasic PRO for PIC32
        • Pascal
          • mikroPascal PRO for PIC32
        • Additional Software
          • CODEGRIP WiFi license
          • CODEGRIP SSL license
          • Visual TFT
          • Visual GLCD
          • Package Manager
          • mikroBootloader
          • CAN calculator
          • GLCD Font Creator
          • Timer Calculator
          • MikroPlot
      • ARM
        • C
          • NECTO Studio
          • mikroC PRO for ARM
        • Basic
          • mikroBasic PRO for ARM
        • Pascal
          • mikroPascal PRO for ARM
        • Additional Software
          • CODEGRIP WiFi license
          • CODEGRIP SSL license
          • Visual TFT
          • Visual TFT AI
          • Visual GLCD
          • Package Manager
          • mikroBootloader
          • CAN calculator
          • GLCD Font Creator
          • Timer Calculator
          • MikroPlot
      • AVR
        • C
          • NECTO Studio
          • mikroC PRO for AVR
        • Basic
          • mikroBasic PRO for AVR
        • Pascal
          • mikroPascal PRO for AVR
        • Additional Software
          • CODEGRIP WiFi license
          • CODEGRIP SSL license
          • Visual TFT
          • Visual GLCD
          • Package Manager
          • mikroBootloader
          • CAN calculator
          • GLCD Font Creator
          • Timer Calculator
          • MikroPlot
      • FT90x
        • C
          • mikroC PRO for FT90x
        • Basic
          • mikroBasic PRO for FT90x
        • Pascal
          • mikroPascal PRO for FT90x
        • Additional Software
          • CODEGRIP WiFi license
          • CODEGRIP SSL license
          • Visual TFT
          • Visual GLCD
          • Package Manager
          • mikroBootloader
          • CAN calculator
          • GLCD Font Creator
          • Timer Calculator
          • MikroPlot
      • 8051
        • C
          • mikroC PRO for 8051
        • Basic
          • mikroBasic PRO for 8051
        • Pascal
          • mikroPascal PRO for 8051
        • Additional Software
          • CODEGRIP WiFi license
          • CODEGRIP SSL license
          • Visual TFT
          • Visual GLCD
          • Package Manager
          • mikroBootloader
          • CAN calculator
          • GLCD Font Creator
          • Timer Calculator
          • MikroPlot
    • Dev Boards
      • PIC (8-bit)
        • 8th Generation
          • Fusion for PIC v8
          • EasyPIC PRO v8
          • EasyPIC PRO v8 over USB-C
          • EasyPIC v8
          • EasyPIC v8 over USB-C
          • UNI-DS v8
          • UNI-DS v8 over USB-C
        • 7th Generation
          • EasyPIC PRO v7a
          • PICPLC16 v7a
          • EasyPIC v7a
          • EasyPIC PRO v7
          • EasyPIC v7
        • 6th Generation
          • PICPLC16 v6
      • dsPIC/PIC24 (16-bit)
        • 8th Generation
          • EasyPIC v8 PIC24/dsPIC33
          • EasyPIC v8 for dsPIC30
          • EasyPIC v8 for dsPIC30 over USB-C
          • Fusion for PIC v8
          • UNI-DS v8
          • UNI-DS v8 over USB-C
        • 7th Generation
          • EasyPIC Fusion v7
          • EasyPIC v7 for dsPIC30
        • 6th Generation
          • Easy24-33 v6
      • PIC32 (32-bit)
        • 8th Generation
          • Fusion for PIC32
          • Fusion for PIC32 over USB-C
          • Fusion for PIC v8
          • UNI-DS v8
          • UNI-DS v8 over USB-C
        • 7th Generation
          • EasyPIC Fusion v7
      • ARM (32-bit)
        • 8th Generation
          • Fusion for ARM v8
          • Fusion for ARM v8 over USB-C
          • Fusion for STM32 v8
          • Fusion for STM32 over USB-C
          • Fusion for KINETIS v8
          • Fusion for Kinetis v8 over USB-C
          • Fusion for TIVA v8
          • Fusion for TIVA v8 over USB-C
          • UNI-DS v8
          • UNI-DS v8 over USB-C
        • 7th Generation
          • EasyMx PRO v7a STM32
          • EasyMx PRO v7 STM32
          • EasyMx PRO v7 Tiva
      • AVR (8-bit)
        • 8th Generation
          • EasyAVR v8
          • EasyAVR PRO v8
          • EasyAVR PRO v8 over USB-C
          • UNI-DS v8
          • UNI-DS v8 over USB-C
        • 7th Generation
          • EasyAVR v7
        • 6th Generation
          • AVRPLC16 v6
      • 8051 (8-bit)
        • 7th generation
          • BIG8051
        • 6th Generation
          • Easy8051 v6
      • PSoC (8-bit)
        • 6th Generation
          • UNI-DS6 Development System
      • RISC-V (32bit)
        • 8th Generation
          • UNI-DS v8
          • UNI-DS v8 over USB-C
      • Universal Boards
        • 8th Generation
          • UNI-DS v8
          • UNI-DS v8 over USB-C
          • Fusion for PIC v8
          • Fusion for ARM v8
        • 7th Generation
          • EasyPIC Fusion v7
        • 6th Generation
          • UNI-DS6
          • mikroBoard for PIC 80-pin
          • mikroBoard for AVR
          • mikroBoard for dsPIC
          • mikroBoard for PSoC
          • mikroBoard for 8051
          • mikroBoard for PIC 40-pin
          • mikroBoard for ARM
          • mikroBoard for ARM 144-pin
      • IoT - Wearable
        • Hexiwear
          • Hexiwear
          • Hexiwear Power User Pack
          • Hexiwear Docking Station
          • Hexiwear Battery Pack
          • Hexiwear Color Pack
          • Hexiwear Workstation
      • Analog Boards
        • 7th Generation
          • Analog System Lab Kit PRO
    • Starter Boards
      • PIC (8-bit)
        • Clicker
          • PIC clicker
        • Clicker 2
          • Clicker 2 for PIC18FJ
          • Clicker 2 for PIC18FK
        • Clicker 4
          • Clicker 4 for PIC18F
          • UNI Clicker
        • Ready
          • Ready for PIC Board
          • Ready for PIC (DIP28)
          • PIC-Ready2 Board
          • MMC Ready Board
        • StartUSB
          • StartUSB for PIC
      • dsPIC/PIC24 (16-bit)
        • Clicker 2
          • Clicker 2 for PIC24
          • Clicker 2 for dsPIC33
        • Clicker 4
          • UNI Clicker
        • Ready
          • dsPIC-Ready1 Board
          • dsPIC-Ready2 Board
          • DsPIC-Ready3 Board
          • dsPIC-Ready4 Board
      • PIC32 (32-bit)
        • Clicker
          • PIC32MX clicker
          • 6LoWPAN Clicker
          • PIC32MZ clicker
        • Clicker 2
          • Clicker 2 for PIC32MX
          • Clicker 2 for PIC32MZ
        • Clicker 4
          • UNI Clicker
        • MINI
          • MINI-32 Board
          • MINI-32 for PIC32MZ
        • Flip&Click
          • Flip&Click PIC32MZ
      • ARM (32-bit)
        • Clicker
          • RA4M1 Clicker
          • Kinetis Clicker
          • MSP432 Clicker
          • CEC1702 clicker
          • CEC1302 Clicker
          • STM32 M4 clicker
        • Clicker 2
          • Clicker 2 for STM32
          • Clicker 2 for Kinetis
          • Clicker 2 for CEC1702
          • Clicker 2 for MSP432
          • Clicker 2 for CEC1302
          • Clicker 2 for PSoC 6
        • Clicker 4
          • Clicker 4 for STM32F745VG
          • Clicker 4 for STM32F4
          • Clicker 4 for TMPM3H
          • Clicker 4 for TMPM4K
          • Clicker 4 for STM32
          • UNI Clicker
        • MINI
          • MINI-M4 for STM32
          • MINI-M4 For Kinetis
          • MINI-M4 for Tiva
          • MINI-M4 for Stellaris
          • MINI-M4 for MSP432
          • MINI-M0 for STM32
        • Flip&Click
          • Flip&Click SAM3X
      • AVR (8-bit)
        • Clicker 4
          • UNI Clicker
        • MINI
          • MINI-AT Board - 3.3V
          • MINI-AT Board - 5V
        • Ready
          • Ready for AVR Board
          • Ready For XMEGA
          • mikroXMEGA Board
          • AVR-Ready2 Board
        • StartUSB
          • StartUSB for AVR
      • 8051 (8-bit)
        • Ready
          • 8051-Ready Board
      • FT90x (32-bit)
        • Clicker 2
          • Clicker 2 for FT90x
      • Miscellaneous
        • USB
          • USB Wizard
          • Quail
          • FlowPaw Kit
      • Universal Boards
        • Clicker 4
          • UNI Clicker
    • Prog-Debug
      • PIC (8-bit)
        • CODEGRIP
          • UNI CODEGRIP
          • UNI CODEGRIP - USB-C
          • CODEGRIP for PIC
          • CODEGRIP for PIC USB-C
        • mikroProg
          • mikroProg for PIC
      • dsPIC/PIC24 (16-bit)
        • CODEGRIP
          • UNI CODEGRIP
          • UNI CODEGRIP - USB-C
          • CODEGRIP for PIC
        • mikroProg
          • mikroProg for dsPIC
      • PIC32 (32-bit)
        • CODEGRIP
          • UNI CODEGRIP
          • UNI CODEGRIP - USB-C
          • CODEGRIP for PIC
          • CODEGRIP for PIC USB-C
        • mikroProg
          • mikroProg for PIC32
      • ARM (32-bit)
        • CODEGRIP
          • UNI CODEGRIP
          • UNI CODEGRIP USB-C
          • CODEGRIP for ARM
          • CODEGRIP for ARM USB-C
          • CODEGRIP for STM32
          • CODEGRIP for KINETIS
          • CODEGRIP for Tiva
          • CODEGRIP for Tiva USB-C
        • mikroProg
          • mikroProg for STM32
          • mikroProg for Tiva
          • mikroProg for Kinetis
          • mikroProg for CEC
          • mikroProg for MSP432
          • mikroProg for PSoC 5LP
      • AVR (8-bit)
        • CODEGRIP
          • CODEGRIP for AVR
          • CODEGRIP for AVR - USB-C
          • UNI CODEGRIP
          • UNI CODEGRIP - USB-C
        • mikroProg
          • mikroProg for AVR
      • 8051 (8-bit)
        • mikroProg
          • mikroProg for 8051
      • FT90x (32-bit)
        • mikroProg
          • mikroProg for FT90x
    • Smart Displays
      • 2.8"
        • ARM (32-bit)
        • AVR (8-bit)
        • dsPIC/PIC24 (16-bit)
        • PIC (8-bit)
        • PIC32 (32-bit)
      • 3.5"
        • ARM (32-bit)
        • FT90x (32-bit)
        • PIC (8-bit)
        • PIC32 (32-bit)
      • 4.3"
        • ARM (32-bit)
        • FT90x (32-bit)
        • PIC (8-bit)
        • PIC32 (32-bit)
      • 5"
        • ARM (32-bit)
        • FT90x (32-bit)
        • PIC32 (32-bit)
      • 7"
        • ARM (32-bit)
        • FT90x (32-bit)
    • MCU Cards
      • PIC (8-bit)
        • 8th Generation
        • 7th Generation
        • 6th Generation
      • dsPIC/PIC24 (16-bit)
        • 8th Generation
        • 7th Generation
        • 6th Generation
      • PIC32 (32-bit)
        • 8th Generation
        • 7th Generation
      • ARM (32-bit)
        • 8th Generation
        • 7th Generation
      • AVR (8-bit)
        • 8th Generation
      • RISC-V (32bit)
        • 8th Generation
    • Accessories
      • TFT Displays
      • LCD Displays
      • LED Displays
      • E-Paper Displays
      • Sensors
      • Headers and Connectors
      • Wire Jumpers and Cables
      • Antennas
      • Batteries
      • RFID/NFC
      • Proto
      • Motors
      • Storage
      • Power
      • Adapters
      • Interface
      • Input/Output
      • Miscellaneous
      • FANware
      • MCUs
      • Books
    • Kits
      • PIC Kits
      • dsPIC/PIC24 Kits
      • PIC32 Kits
      • ARM Kits
      • AVR Kits
      • FT90x Kits
      • 8051 Kits
  • Shop
  • EmbeddedWiki
  • Support
    • Helpdesk
    • Contact us
    • Forum
    • LibStock
    • Learn
    • Let's make
    • Books
  • Services
    • Planet Debug
    • Design Service
    • Product Customization
    • Contract Manufacturing
    • Premium Technical Support
  • News
  • My profile
  • Privacy settings
  • Activity
  • Sign out

Your shoppingcart is empty.
Continue shopping.

MikroElektronika white logo
  • Products
    • click boards icon Click Boards
      • Wireless Connectivity
        • GPS/GNSS
        • GSM/LTE
        • LTE IoT
        • BT/BLE
        • WiFi
        • RFID/NFC
        • GSM+GPS
        • 6LoWPAN
        • ZigBee
        • UWB
        • SigFox
        • Sub-1 GHz Transceievers
        • 2.4 GHz Trancevers
        • LoRa
        • WiFi+BLE
      • Sensors
        • Biometrics
        • Gas
        • Magnetic
        • Motion
        • Optical
        • Pressure
        • Proximity
        • Temperature & humidity
        • Current sensor
        • Miscellaneous
        • Environmental
        • Force
        • Inductance
        • RF meter
        • Click Shields
        • Click Bundles
      • Interface
        • Adapter
        • CAN
        • Port expander
        • RS485
        • USB
        • 1-Wire
        • RS232
        • Ethernet
        • LIN
        • PWM
        • Current
        • DALI
        • I2C
        • Fiber optics
        • SPI
        • DMX
        • CXPI
        • Click Shields
        • Click Bundles
      • Display & LED
        • LED Drivers
        • LED Matrix
        • LED Segment
        • OLED
        • LCD
        • TFT
        • Click Shields
        • Click Bundles
      • Miscellaneous
        • Relay
        • Optocoupler
        • ID
        • Proto
        • Encryption
        • Click Shields
        • Click Bundles
      • Mixed Signal
        • ADC
        • Measurements
        • DAC
        • Digital potentiometer
        • ADC-DAC
        • Click Shields
        • Click Bundles
      • Storage
        • EEPROM
        • FLASH
        • FRAM
        • microSD
        • MRAM
        • SRAM
        • EERAM
        • ReRAM
        • DRAM
        • Click Shields
        • Click Bundles
      • Motor Control
        • Brushed
        • Brushless
        • Servo
        • Stepper
        • Click Shields
        • Click Bundles
      • Audio & Voice
        • Amplifier
        • Microphone
        • Speakers
        • Signal Processing
        • Speech recognition
        • FM
        • MP3
        • Click Shields
        • Click Bundles
      • HMI
        • Capacitive
        • Pushbutton/Switches
        • Potentiometers
        • Rotary encoder
        • Haptic
        • Fingerprint
        • Click Shields
        • Click Bundles
      • Clock & Timing
        • RTC
        • Clock generator
        • Click Shields
        • Click Bundles
      • Power Management
        • Battery charger
        • Boost
        • Buck
        • Linear
        • Buck-Boost
        • Wireless Charging
        • Power Switch
        • USB-C PD
        • Click Shields
        • Click Bundles
      • Click Bundles
      • Click Shields
    • necto icon NECTO
      • NECTO Studio
    • compilers icon Compilers
      • PIC
        • C
          • NECTO Studio
          • mikroC PRO for PIC
        • Basic
          • mikroBasic PRO for PIC
        • Pascal
          • mikroPascal PRO for PIC
        • Additional Software
          • CODEGRIP WiFi license
          • CODEGRIP SSL license
          • Visual TFT
          • Visual TFT AI
          • Visual GLCD
          • Package Manager
          • mikroBootloader
          • CAN calculator
          • GLCD Font Creator
          • Timer Calculator
          • MikroPlot
      • dsPIC/PIC24
        • C
          • NECTO Studio
          • mikroC PRO for dsPIC
        • Basic
          • mikroBasic PRO for dsPIC
        • Pascal
          • mikroPascal PRO for dsPIC
        • Additional Software
          • CODEGRIP WiFi license
          • CODEGRIP SSL license
          • Visual TFT
          • Visual GLCD
          • Package Manager
          • mikroBootloader
          • CAN calculator
          • GLCD Font Creator
          • Timer Calculator
          • MikroPlot
      • PIC32
        • C
          • NECTO Studio
          • mikroC PRO for PIC32
        • Basic
          • mikroBasic PRO for PIC32
        • Pascal
          • mikroPascal PRO for PIC32
        • Additional Software
          • CODEGRIP WiFi license
          • CODEGRIP SSL license
          • Visual TFT
          • Visual GLCD
          • Package Manager
          • mikroBootloader
          • CAN calculator
          • GLCD Font Creator
          • Timer Calculator
          • MikroPlot
      • ARM
        • C
          • NECTO Studio
          • mikroC PRO for ARM
        • Basic
          • mikroBasic PRO for ARM
        • Pascal
          • mikroPascal PRO for ARM
        • Additional Software
          • CODEGRIP WiFi license
          • CODEGRIP SSL license
          • Visual TFT
          • Visual TFT AI
          • Visual GLCD
          • Package Manager
          • mikroBootloader
          • CAN calculator
          • GLCD Font Creator
          • Timer Calculator
          • MikroPlot
      • AVR
        • C
          • NECTO Studio
          • mikroC PRO for AVR
        • Basic
          • mikroBasic PRO for AVR
        • Pascal
          • mikroPascal PRO for AVR
        • Additional Software
          • CODEGRIP WiFi license
          • CODEGRIP SSL license
          • Visual TFT
          • Visual GLCD
          • Package Manager
          • mikroBootloader
          • CAN calculator
          • GLCD Font Creator
          • Timer Calculator
          • MikroPlot
      • FT90x
        • C
          • mikroC PRO for FT90x
        • Basic
          • mikroBasic PRO for FT90x
        • Pascal
          • mikroPascal PRO for FT90x
        • Additional Software
          • CODEGRIP WiFi license
          • CODEGRIP SSL license
          • Visual TFT
          • Visual GLCD
          • Package Manager
          • mikroBootloader
          • CAN calculator
          • GLCD Font Creator
          • Timer Calculator
          • MikroPlot
      • 8051
        • C
          • mikroC PRO for 8051
        • Basic
          • mikroBasic PRO for 8051
        • Pascal
          • mikroPascal PRO for 8051
        • Additional Software
          • CODEGRIP WiFi license
          • CODEGRIP SSL license
          • Visual TFT
          • Visual GLCD
          • Package Manager
          • mikroBootloader
          • CAN calculator
          • GLCD Font Creator
          • Timer Calculator
          • MikroPlot
    • dev boards icon Dev Boards
      • PIC (8-bit)
        • 8th Generation
          • Fusion for PIC v8
          • EasyPIC PRO v8
          • EasyPIC PRO v8 over USB-C
          • EasyPIC v8
          • EasyPIC v8 over USB-C
          • UNI-DS v8
          • UNI-DS v8 over USB-C
        • 7th Generation
          • EasyPIC PRO v7a
          • PICPLC16 v7a
          • EasyPIC v7a
          • EasyPIC PRO v7
          • EasyPIC v7
        • 6th Generation
          • PICPLC16 v6
      • dsPIC/PIC24 (16-bit)
        • 8th Generation
          • EasyPIC v8 PIC24/dsPIC33
          • EasyPIC v8 for dsPIC30
          • EasyPIC v8 for dsPIC30 over USB-C
          • Fusion for PIC v8
          • UNI-DS v8
          • UNI-DS v8 over USB-C
        • 7th Generation
          • EasyPIC Fusion v7
          • EasyPIC v7 for dsPIC30
        • 6th Generation
          • Easy24-33 v6
      • PIC32 (32-bit)
        • 8th Generation
          • Fusion for PIC32
          • Fusion for PIC32 over USB-C
          • Fusion for PIC v8
          • UNI-DS v8
          • UNI-DS v8 over USB-C
        • 7th Generation
          • EasyPIC Fusion v7
      • ARM (32-bit)
        • 8th Generation
          • Fusion for ARM v8
          • Fusion for ARM v8 over USB-C
          • Fusion for STM32 v8
          • Fusion for STM32 over USB-C
          • Fusion for KINETIS v8
          • Fusion for Kinetis v8 over USB-C
          • Fusion for TIVA v8
          • Fusion for TIVA v8 over USB-C
          • UNI-DS v8
          • UNI-DS v8 over USB-C
        • 7th Generation
          • EasyMx PRO v7a STM32
          • EasyMx PRO v7 STM32
          • EasyMx PRO v7 Tiva
      • AVR (8-bit)
        • 8th Generation
          • EasyAVR v8
          • EasyAVR PRO v8
          • EasyAVR PRO v8 over USB-C
          • UNI-DS v8
          • UNI-DS v8 over USB-C
        • 7th Generation
          • EasyAVR v7
        • 6th Generation
          • AVRPLC16 v6
      • 8051 (8-bit)
        • 7th generation
          • BIG8051
        • 6th Generation
          • Easy8051 v6
      • PSoC (8-bit)
        • 6th Generation
          • UNI-DS6 Development System
      • RISC-V (32bit)
        • 8th Generation
          • UNI-DS v8
          • UNI-DS v8 over USB-C
      • Universal Boards
        • 8th Generation
          • UNI-DS v8
          • UNI-DS v8 over USB-C
          • Fusion for PIC v8
          • Fusion for ARM v8
        • 7th Generation
          • EasyPIC Fusion v7
        • 6th Generation
          • UNI-DS6
          • mikroBoard for PIC 80-pin
          • mikroBoard for AVR
          • mikroBoard for dsPIC
          • mikroBoard for PSoC
          • mikroBoard for 8051
          • mikroBoard for PIC 40-pin
          • mikroBoard for ARM
          • mikroBoard for ARM 144-pin
      • IoT - Wearable
        • Hexiwear
          • Hexiwear
          • Hexiwear Power User Pack
          • Hexiwear Docking Station
          • Hexiwear Battery Pack
          • Hexiwear Color Pack
          • Hexiwear Workstation
      • Analog Boards
        • 7th Generation
          • Analog System Lab Kit PRO
    • starter boards icon Starter Boards
      • PIC (8-bit)
        • Clicker
          • PIC clicker
        • Clicker 2
          • Clicker 2 for PIC18FJ
          • Clicker 2 for PIC18FK
        • Clicker 4
          • Clicker 4 for PIC18F
          • UNI Clicker
        • Ready
          • Ready for PIC Board
          • Ready for PIC (DIP28)
          • PIC-Ready2 Board
          • MMC Ready Board
        • StartUSB
          • StartUSB for PIC
      • dsPIC/PIC24 (16-bit)
        • Clicker 2
          • Clicker 2 for PIC24
          • Clicker 2 for dsPIC33
        • Clicker 4
          • UNI Clicker
        • Ready
          • dsPIC-Ready1 Board
          • dsPIC-Ready2 Board
          • DsPIC-Ready3 Board
          • dsPIC-Ready4 Board
      • PIC32 (32-bit)
        • Clicker
          • PIC32MX clicker
          • 6LoWPAN Clicker
          • PIC32MZ clicker
        • Clicker 2
          • Clicker 2 for PIC32MX
          • Clicker 2 for PIC32MZ
        • Clicker 4
          • UNI Clicker
        • MINI
          • MINI-32 Board
          • MINI-32 for PIC32MZ
        • Flip&Click
          • Flip&Click PIC32MZ
      • ARM (32-bit)
        • Clicker
          • RA4M1 Clicker
          • Kinetis Clicker
          • MSP432 Clicker
          • CEC1702 clicker
          • CEC1302 Clicker
          • STM32 M4 clicker
        • Clicker 2
          • Clicker 2 for STM32
          • Clicker 2 for Kinetis
          • Clicker 2 for CEC1702
          • Clicker 2 for MSP432
          • Clicker 2 for CEC1302
          • Clicker 2 for PSoC 6
        • Clicker 4
          • Clicker 4 for STM32F745VG
          • Clicker 4 for STM32F4
          • Clicker 4 for TMPM3H
          • Clicker 4 for TMPM4K
          • Clicker 4 for STM32
          • UNI Clicker
        • MINI
          • MINI-M4 for STM32
          • MINI-M4 For Kinetis
          • MINI-M4 for Tiva
          • MINI-M4 for Stellaris
          • MINI-M4 for MSP432
          • MINI-M0 for STM32
        • Flip&Click
          • Flip&Click SAM3X
      • AVR (8-bit)
        • Clicker 4
          • UNI Clicker
        • MINI
          • MINI-AT Board - 3.3V
          • MINI-AT Board - 5V
        • Ready
          • Ready for AVR Board
          • Ready For XMEGA
          • mikroXMEGA Board
          • AVR-Ready2 Board
        • StartUSB
          • StartUSB for AVR
      • 8051 (8-bit)
        • Ready
          • 8051-Ready Board
      • FT90x (32-bit)
        • Clicker 2
          • Clicker 2 for FT90x
      • Miscellaneous
        • USB
          • USB Wizard
          • Quail
          • FlowPaw Kit
      • Universal Boards
        • Clicker 4
          • UNI Clicker
    • prog-debug icon Prog-Debug
      • PIC (8-bit)
        • CODEGRIP
          • UNI CODEGRIP
          • UNI CODEGRIP - USB-C
          • CODEGRIP for PIC
          • CODEGRIP for PIC USB-C
        • mikroProg
          • mikroProg for PIC
      • dsPIC/PIC24 (16-bit)
        • CODEGRIP
          • UNI CODEGRIP
          • UNI CODEGRIP - USB-C
          • CODEGRIP for PIC
        • mikroProg
          • mikroProg for dsPIC
      • PIC32 (32-bit)
        • CODEGRIP
          • UNI CODEGRIP
          • UNI CODEGRIP - USB-C
          • CODEGRIP for PIC
          • CODEGRIP for PIC USB-C
        • mikroProg
          • mikroProg for PIC32
      • ARM (32-bit)
        • CODEGRIP
          • UNI CODEGRIP
          • UNI CODEGRIP USB-C
          • CODEGRIP for ARM
          • CODEGRIP for ARM USB-C
          • CODEGRIP for STM32
          • CODEGRIP for KINETIS
          • CODEGRIP for Tiva
          • CODEGRIP for Tiva USB-C
        • mikroProg
          • mikroProg for STM32
          • mikroProg for Tiva
          • mikroProg for Kinetis
          • mikroProg for CEC
          • mikroProg for MSP432
          • mikroProg for PSoC 5LP
      • AVR (8-bit)
        • CODEGRIP
          • CODEGRIP for AVR
          • CODEGRIP for AVR - USB-C
          • UNI CODEGRIP
          • UNI CODEGRIP - USB-C
        • mikroProg
          • mikroProg for AVR
      • 8051 (8-bit)
        • mikroProg
          • mikroProg for 8051
      • FT90x (32-bit)
        • mikroProg
          • mikroProg for FT90x
    • smart displays icon Smart Displays
      • 2.8"
        • ARM (32-bit)
        • AVR (8-bit)
        • dsPIC/PIC24 (16-bit)
        • PIC (8-bit)
        • PIC32 (32-bit)
      • 3.5"
        • ARM (32-bit)
        • FT90x (32-bit)
        • PIC (8-bit)
        • PIC32 (32-bit)
      • 4.3"
        • ARM (32-bit)
        • FT90x (32-bit)
        • PIC (8-bit)
        • PIC32 (32-bit)
      • 5"
        • ARM (32-bit)
        • FT90x (32-bit)
        • PIC32 (32-bit)
      • 7"
        • ARM (32-bit)
        • FT90x (32-bit)
    • mcu cards icon MCU Cards
      • PIC (8-bit)
        • 8th Generation
        • 7th Generation
        • 6th Generation
      • dsPIC/PIC24 (16-bit)
        • 8th Generation
        • 7th Generation
        • 6th Generation
      • PIC32 (32-bit)
        • 8th Generation
        • 7th Generation
      • ARM (32-bit)
        • 8th Generation
        • 7th Generation
      • AVR (8-bit)
        • 8th Generation
      • RISC-V (32bit)
        • 8th Generation
    • accessories icon Accessories
      • TFT Displays
      • LCD Displays
      • LED Displays
      • E-Paper Displays
      • Sensors
      • Headers and Connectors
      • Wire Jumpers and Cables
      • Antennas
      • Batteries
      • RFID/NFC
      • Proto
      • Motors
      • Storage
      • Power
      • Adapters
      • Interface
      • Input/Output
      • Miscellaneous
      • FANware
      • MCUs
      • Books
    • kits icon Kits
      • PIC Kits
      • dsPIC/PIC24 Kits
      • PIC32 Kits
      • ARM Kits
      • AVR Kits
      • FT90x Kits
      • 8051 Kits
  • Shop
  • EmbeddedWiki
  • Support
    • Helpdesk
    • Contact us
    • Forum
    • LibStock
    • Learn
    • Let's make
    • Books
  • Services
    • Planet Debug
    • Design Service
    • Product Customization
    • Contract Manufacturing
    • Premium Technical Support
  • News
  • Price :

    More info
Reset filter
  • 0
Authentication
Account

Create account

Forgot your password?

Your cart is empty !
View cart ( )
  1. Home
  2. ebooks
  3. PIC Microcontrollers - Programming in Basic
  4. compiler-mikrobasic-pro-for-pic
MikroElektronika books

2.3 Compiler MikroBasic PRO for PIC

 
Everything you have read so far about programming in Basic is just a theory. It is useful to know, of course, but don’t forget that this programming language is not much in connection with something concrete and tangible. You will experience many problems with accurate names of registers, their addresses, names of particular control bits and many others when you start writing your first program in Basic. The point is that you need more than theory to make the microcontroller do something useful. Having in mind a saying ‘Prevention is better than cure’, we have to remind you of all the things you must have settled before you start writing a program for the microcontroller. First of all, you need a program installed on your PC which understands the programming language you are going to use and which provides appropriate working environment for it. There is no such a compiler sutable for only one type of microcontrollers nor for all microcontrollers. It’s about software used for programming similar microcontrollers of one manufacturer. We have previously introduced mikroBasic language which has been especially designed for programming PIC microcontrollers. Now, when you know enough about it, it’s time to present the software you are going to use for developing and editing your projects. This software is called the mikroBasic PRO for PIC compiler. It’s IDE (Integrated Development Environment) includes all the tools you need to develop your projects (editor, compiler debugger etc.) As its name implies, the mikroBasic PRO for PIC compiler is intended for writing programs for PIC microcontrollers in the Basic language. It contains information about architecture of PIC microcontrollers (registers, their accurate addresses, memory modules, operation of its modules, instruction set, pinout etc.). Moreover, it includes specific tools for PIC microcontroller programming. So, the first thing you have to do when you start up the compiler is to select the chip and operating frequency from the list. This is not the end. This is the beginnig. You can finally start writing your program in Basic. The process of creating and executing a project can be divided in several parts:
  1. Creation of the project (project name, project settings, file dependancies);
  2. Editing of the program;
  3. Compilation of the program and correction of errors;
  4. Debugging (execute your program step by step to make sure that it performs the operations you expect);
  5. Microcontroller programming (load the .hex file genertaed by the compiler into the microcontroller by using thePICflash programmer).

INSTALLING MIKROBASIC PRO FOR PIC

The installation of mikroBasic PRO for PIC is similar to the installation of any other Windows program and the whole procedure is carried out through Wizard:
pic-microcontrollers-programming-in-basic-chapter-02-image-22
You just have to follow the instructions and click on Next, OK, Next, Next... The same old story except for the last option 'Do you want to install PICFLASH v7.11 programmer?'. Does it make you question what to do? As you know, the compiler translates a program written in Basic into a hex code. The next step is to load that code into the microcontroller. That’s why you need the PICFLASH programmer. Install it!
pic-microcontrollers-programming-in-basic-chapter-02-image-23
After completing the PICFLASH installation, you will be asked for the installation of another similar program. It is a software for programming a special family of PIC microcontrollers which operate in low consumption mode (3.3 V). Skip it... The last step - driver installation!
pic-microcontrollers-programming-in-basic-chapter-02-image-24
A driver is a program which enables the operating system to communicate with a peripheral device. In our case, this device is the hardware programmer of your development system. You definitely need it. Click Yes.
pic-microcontrollers-programming-in-basic-chapter-02-image-25
A type of driver to be installed depends on the operating system in use. In this case, the PC runs a 32-bit operating system Windows XP. Select the Win 2000, XP, 2003 32-bit folder containing the appropriate driver and start up its installation. Now you are safe, just keep on clicking Next, OK, Next, Next...
pic-microcontrollers-programming-in-basic-chapter-02-image-26

IDE OF MIKROBASIC PRO FOR PIC

This is what appears on your screen when you start up mikroBasic PRO for PIC for the very first time:
pic-microcontrollers-programming-in-basic-chapter-02-image-27
Unfortunately, a detailed description of all the options available in this IDE would take up too much time, so we are not going into it. We are going to describe only the most important features of the mikroBasic PRO for PIC compiler, instead. Of course, you can always get more information by pressing the Help button [F1]. A detailed explanation on how to create a new project and write a program is given in several practical examples in Chapter 4 of this book.

PROJECT MANAGER

A program written in the mikroBasic PRO for PIC compiler is not a separate document, but a part of a project that also includes hex code, assembly code, and other files. Some of them are created during the compiler’s operation, while some are imported from other programs. However, the Project Manager window enables you to handle all of the project files. Just right click on any folder and select the option you need for your project.
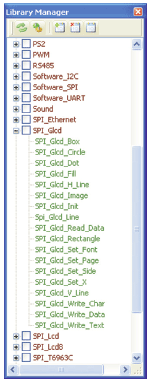
pic-microcontrollers-programming-in-basic-chapter-02-image-28

LIBRARY MANAGER

Libraries contain a large number of ready-to-use functions and provide a lot of facilities when writing programs for PIC MCUs. The compiler must know all dependencies of your mikroBasic source file in order to compile it properly. You should open the Library Manager window and check libraries you want to use in your program. When a library is checked, it is automatically added to the project and linked during the compiling process. Thus, you don’t have to include them manually into your source code files using the #include directive. For example, if your program uses an LCD then there is no need to write new functions because by selecting the Lcd Library you will be able to use ready-to-use LCD functions in your program. If this library is not selected in the Library Manager, every time you try to use any of its functions, the compiler will report an error. A description of each library is available by right clicking on its name and selecting the Help option.
pic-microcontrollers-programming-in-basic-chapter-02-image-29

CODE EXPLORER

The Code Explorer window enables you to easily locate objects (functions, constants, procedures etc.) within long programs. For example, if you look for a function used in the program, just double click its name in this window, and the cursor will be automatically positioned at the appropriate line in the program.
pic-microcontrollers-programming-in-basic-chapter-02-image-30

PROJECT SETTINGS

When compiling a project, the compiler generates files to be loaded into the microcontroller. These files will be different depending on the type of the microcontroller and the purpose of the compilation. Thus, in order to enable the compiler to operate properly, it is necessary to set some project parameters in the Project Settings window:
Device: Selection of the microcontroller to be used enables the compiler to retrieve the associated definition file. The definition file of a microcontroller contain specific information on its SFR registers, their memory addresses and some variables specific to that microcontroller. It is all mandatory for creating a compatible .hex file. Oscillator: This option is used to specify the operating speed of the microcontroller. Of course this value depends on the oscillator in use. It is retrieved by the compiler for compiling routines which require time information (function Delay_ms( ) for example). Later, this information will also be used by the programmer. The operating speed is set so as to enable the microcontroller’s internal oscillator to operate at selected frequency. pic-microcontrollers-programming-in-basic-chapter-02-image-31
Build/Debugger Type: The whole compiling process is called building and includes parsing, compiling, linking and generation of .hex files. The build type enables you to set up the building mode. Depending on your choice of mode, the generated file to be loaded into the microcontroller will be different. Build type - release: The program to be loaded into the microcontroller will not contain any complementary information to be debugged later. After completing the compiling process, the compiler has no more influence on the program execution. Build type - ICD debug: Some information is added to the .hex file in order to allow you to perform hardware debugging. When the compiling process is completed and the microcontroller is programmed, the compiler remains connected to the microcontroller and still can affect its operation. A tool called mikroICD (In Circuit Debugger) enables the program to be executed step by step and provides an access to the current content of all registers of the microcontroller. For the purpose of debugging, a software simulator can be used in both build type modes. It enables you to simulate your program by reproducing the microcontroller behaviour. The simulator doesn’t use real devices for its operation, so that some operations cannot be reproduced (interrupt, for example). However, it is faster to debug a program by using simulator and it doesn’t require any taget device. Note that any of these settings can be modified at any time while editing the program. Don’t forget to re-build and re-program your device after modifying any of those settings.

EDITING AND COMPILING PROGRAMS

CODE EDITOR

Code Editor is a central part of the compiler window used for writing and editing programs. A large number of options used for setting its functions and layout can be found in the Tools/Options menu [F12]. When you write a program, don’t forget comments. Comments are very important for the program debugging and upgrading. Moreover, even if the compiler doesn’t have formatting restriction, you should always follow the same editing rules (like in the examples provided in this book). As there is no line length limitation, don’t hesitate to use blank spaces in order to make your code more readable.
pic-microcontrollers-programming-in-basic-chapter-02-image-32
When you write a program, compile it regularly in order to correct syntax errors as you come along. You can also compile your program every time the redaction of a new function is completed and test its behaviour by using debug mode. In this way, it is much easier to fix compilation errors. Otherwise, you will be compelled to modify the entire program.

COMPILING AND FIXING ERRORS

To compile your code, you just have to click on the Build option in the Project menu. In fact, the entire project is compiled and, in case the compilation is sucessful, the output files are generated (asm, .hex etc.). A compilation is successful if no error was found. The compilation generates many messages which are displayed in the Messages window. These messages consist of information, warnings and errors. Each error found is associated with its program line and description. As an error in your code can generate many other errors, you should always try to fix the first error on the list and then recompile your program. In other words, it is advisable to fix errors one by one.
pic-microcontrollers-programming-in-basic-chapter-02-image-33
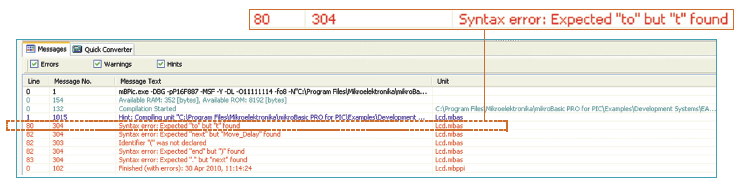
In the previous example, the program reports a syntax error in the 80th line. The compilation enables you to correct your program by fixing all mikroBasic errors. When all the errors are fixed, your program is ready to be dumped into the microcontroller. However, your job is not finished yet because you still don’t know whether your program behaves as expected or not.

DEBUGGING YOUR PROGRAM

As we could see before, there are two debug modes: a software debugger which simulates actions of the microcontroller (default mode) and a hardware debugger (mikroICD) which directly reads the content of the microcontroller memory. Whatever mode you choose, the debugging procedure is the same. In case you choose ICD debug make sure you load your program into the microcontroller. Debugging is a very important step as it allows you to test your program after a sucessful compilation, or to fix bugs discovered in a running program. To start the debugger, click on the Start debugger option from the Run menu. The code editor will automatically be slightly modified and a window called Watch Values will appear. The principle of debugging is based on running a program step by step and following the evolution of the content of registers and variable values. In this way, you will be able to verify the computation and to see if something unexpected has occured. By running the program step by step, you will be able to easily locate where problems occur. As debugging can lead to program modification, you should always re-compile the program after each correction and restart the debugger in order to verify what you have changed.

SOFTWARE SIMULATOR

If you wish to be a programmer and devote yourself to programming microcontrollers, then you have to get used to the fact that programs almost NEVER work on the first try or start using a simulator. The simulator is an integral part of the compiler used to simulate the operation of the microcontroller. Prior to starting up the simulator, select its operating mode in the Project Settings window (Build type - release), compile the program and click the Run /Start Debugger option.
The compiler will be automatically set to simulation mode. As such, it monitors the state of all register bits and enables you to execute the program step by step while monitoring the operation of the microcontroller on the screen. A few icons, used only for the operation of this simulator, will appear in the toolbar when the compiler is set to this mode.
pic-microcontrollers-programming-in-basic-chapter-02-image-35 pic-microcontrollers-programming-in-basic-chapter-02-image-34
These icons have the following meanings:
  • Step Into: Execute the current program line, then halts. If the executed program line calls a subroutine, the debugger steps into the subroutine and halts after executing the first instruction within it.
  • Step Over: Execute the current program line, then halts. If the executed program line calls a subroutine, the debugger will not step into it. The whole subroutine will be executed and the debugger halts at the first instruction following the call. It seems that one program line is skipped even though the whole subroutine is executed. As a result, the state of registers is changed. This command is commonly used when it is necessary to speed up the execution of long program loops.
  • Run To Cursor: Execute all the program lines until the cursor position is reached.
  • Step out: Execute all remaining program lines within the subroutine. The debugger halts immediately after exiting the subroutine.
Breakpoints make the process of debugging programs more efficient by enabling you to stop the program execution at some specific line. This is very useful as you will be able to check only critical parts of the program, not lose your time by testing the whole program line by line. To add or remove a breakpoint you just have to click on the left side of your code editor on the appropriate line or press [F5]. A small window called Breakpoints indicates you where the breakpoints are located. Note that the lines marked by breakpoints are highlighted in red.
pic-microcontrollers-programming-in-basic-chapter-02-image-36
The line being currently executed is highlighted in blue. You can read the content of registers and variables you have selected in Watch Values at any time. If you want to jump directly to breakpoints, use the Run/Pause Debugger command.

WATCH VALUES WINDOW

The software and harware debuggers have the same function to monitor the state of registers during program execution. The difference is that the software debugger simulates the execution of the program on a PC, while the ICD debugger uses the microcontroller. Any change of a pin logic state is reflected on the appropriate register (port). As the Watch Values window enables you to monitor the state of all registers, it is easy to check whether a pin is set or cleared. The latest modifications appears in red in this window. This enables you to easily locate modifications in the list file when debugging. Select View/Windows and click the Watch Values option to activate this window. You can make a list of registers/variables the state of which you want to monitor.
pic-microcontrollers-programming-in-basic-chapter-02-image-37

STOPWATCH

If you want to find out how long it takes for the microcontroller to execute a part of the program, select the Run/View Stopwatch option. A window, as shown in figure on the right, will appear. Do you know how the stopwatch works? Well, it’s as simple as that. The times (time when the program has been started, time of the last step execution etc.) are automatically measured for each action of the debugger (step into, step over, run/pause etc.) and displayed in the Stopwatch window.
pic-microcontrollers-programming-in-basic-chapter-02-image-38

IN-CIRCUIT DEBUGGER

Another way to check a program execution is by using mikroICD debugger (in-circuit debugger). The mikroICD is an integral part of the PICflash programmer. It is used for testing and debugging programs. The process of testing and debugging is performed by monitoring the state of all registers within the microcontroller which operates in real time. In order to enable debugging, it is necessary to select options Build Type-ICD Debug and Debugger-mikroICD before the program is loaded into the microcontroller. As soon as the mikroICD debugger starts up, a window, as shown in figure below, appears. The mikroICD debugger communicates with the PIC through its pins used for programming. Therefore, these pins cannot be used as I/O pins while the process of debugging is in progress. During the mikroICD debugger operation, programmer and PC have to be connected using a USB cable.
pic-microcontrollers-programming-in-basic-chapter-02-image-39
mikroICD debugger options:
  • Start Debugger [F9]
  • Run/Pause Debugger [F6]
  • Stop Debugger [Ctrl+F2]
  • Step Into [F7]
  • Step Over [F8]
  • Step Out [Ctrl+F8]
  • Toggle Breakpoint [F5]
  • Show/Hide Breakpoints [Shift+F4]
  • Clear Breakpoints [Ctrl+Shift+F4]
Each of these commands is activated via keyboard shortcuts or by clicking appropriate icon within the Watch Values window. The mikroICD debugger also offers options such as running a program step by step (single stepping), pausing the program execution to examine the state of currently active registers using breakpoints, tracking values of some variables etc. The following example illustrates a step-by-step program execution using the Step Over command.
pic-microcontrollers-programming-in-basic-chapter-02-image-40

Step 1:

In this example the 31st program line is highlighted in blue, which means that it will be executed next. The current state of all registers within the microontroller can be viewed in the mikroICD Watch Values window.
pic-microcontrollers-programming-in-basic-chapter-02-image-41

Step 2:

After the Step Over command [F8] is executed, the microcontroller will execute the 31st program line. The first next line (32nd) to be executed is highlighted in blue. The state of registers being changed during the execution of this instruction may be viewed now in the Watch Values window.
pic-microcontrollers-programming-in-basic-chapter-02-image-42

LOADING PROGRAM INTO THE MICROCONTROLLER

If you have fixed all errors in your code and you think the program is ready for use, then you should load it into the microcontroller. Use the PICflash programmer for this purpose. PICflash is a tool designed to program all types of PIC microcontrollers. It is composed of two parts:
  • The hardware part buffers a hexadecimal file (the program to be loaded) and programs the microcontroller using specific voltage levels. During the process of programming, a new program is written into the microcontroller’s flash memory. The previous program will be automatically erased from the flash memory.
  • The software part is in charge of sending program (.hex file) to the hardware part of the programmer over a USB cable. It is activated by clicking mE_Programmer from the Tools menu or by pressing [F11]. As a result, you can modify some programming settings and also control the operation of the programmer’s hardware (Load, Write, Verify...).
pic-microcontrollers-programming-in-basic-chapter-02-image-43
Note that you can re-program your microcontroller as many times as you wish.

COMPILER’S TOOLS

This compiler provides special tools which considerably simplify the process of program writing. All these tools are available from the Tools menu. Here is a brief description for all of them.

USART TERMINAL

The USART terminal is a replacement for the standard Windows Hyper Terminal. It can be used for checking the operation of the microcontroller which uses USART communication. Such microcontrollers are built into the target device and connected to the PC’s RS-232 connector over a serial cable. The USART terminal window contains options for setting serial communication and displaying sent/received data.
pic-microcontrollers-programming-in-basic-chapter-02-image-44

EEPROM EDITOR

By selecting the EEPROM Editor option from the Tools menu, a window, as shown in figure below, will appear. Here you can see how the EEPROM memory of the microcontroller looks like. If you want to change its contents after loading the program into the microcontroller this is the right way to do it. If a new content is a data of specific type (char, int or double), then you should select it, enter the value in the Edit Value field and click Edit. Then click the Save button to save it as a document with the .hex extension. If the Use EEPROM in Project option is active, the data will be automatically loaded into the microcontroller during the programming process.
pic-microcontrollers-programming-in-basic-chapter-02-image-45

ASCII CHART

If you need numerical representation of any ASCII character, just select the ASCII chart option from the Tools menu and the table, as shown in figure below, will appear.
pic-microcontrollers-programming-in-basic-chapter-02-image-46
You probably know that every key of your keyboard is associated with one code (ASCII). Numbers have strange equivalents. For this reason, the program instruction for displaying number 7 on an LCD will not display it, but the equivalent of the BEL instruction. If you send the same number as a character, you will get the expected result - number 7. Accordingly, if you want to display a number without previously converting it into appropriate character, then it is necessary to add number 48 to each digit the number to be displayed consists of.

SEVEN SEGMENT EDITOR

A seven segment editor enables you to easily find out which number is necessary to be set on an output port in order to display a desired symbol. Of course, it goes without saying that port pins must be properly connected to display segments. You just have to place the cursor on any display segment and click it. The number that you should enter into the program will be shown immediately. That’s all.
pic-microcontrollers-programming-in-basic-chapter-02-image-47

LCD CUSTOM CHARACTER

In addition to the standard characters, the LCD display can also display characters created by the programmer. By selecting the LCD custom character tool you will spare yourself from tedious work of writing functions for sending appropriate code to a display. Just create a symbol by clicking small squares in the LCD custom character window, select position and row and click the GENERATE button. The appropriate code appears in another window. No more clicks are needed. Copy to Clipboard - Paste...
pic-microcontrollers-programming-in-basic-chapter-02-image-48

GRAPHIC LCD BITMAP GENERATOR

This is another necessary tool in case the microcontroller you are writing program for uses graphic LCD display (GLCD). This tool enables you to display any bitmap easily. In order to take advantage of it, select Tools/Glcd Bitmap Editor and appropriate window appears. Select the type of display to be used and load a bitmap. The bitmap must be monochromatic and in specified resolution (128 x 64 pixels in this case). Further procedure is the same as in the example above. Copy to Clipboard...
pic-microcontrollers-programming-in-basic-chapter-02-image-49
Every code generated using tools for controlling LCD and GLCD displays contains functions of the Lcd library. If you use them in the program, don’t forget to check the box next to this library in the Library Manager window so as to enable the compiler to recognize these functions correctly.

LIBRARIES

If you need a function or a procedure to perform certain task while writing a program, you just have to find it in one of the libraries included into the compiler and use it. A library is actually a file called header. It contains a group of variables and functions written in mikroBasic. Each library has a specific purpose. For example, if you need a procedure to generate an audio signal on some pin, open the Sound library in the Library Manager window and double click the appropriate procedure Sound_Play. A detailed description of this procedure appears on the screen. Copy it to your program and set appropriate parameters. If this library is checked, its functions will be retrieved during the process of compiling and it will not be necessary to use the include directive. The mikroBasic PRO for PIC includes miscellaneous and hardware specific libraries. One of the most useful features of the mikroBasic PRO for PIC compiler is the Library Manager and surely deserves our attention.
pic-microcontrollers-programming-in-basic-chapter-02-image-50

MISCELLANEOUS LIBRARIES

Miscellaneous libraries contain some of the general-purpose functions:
LIBRARY DESCRIPTION
Button Library Function eliminates the influence of contact button flickering
Conversions Library Library routines for numerals to strings and BCD/decimal conversions
C Type Library Library functions for testing and mapping characters
String Library Library which automatizes string related tasks
Time Library Time library routines usage for time calculations in UNIX time format
Trigon Library Library functions for floating point math handling

HARDWARE SPECIFIC LIBRARIES

Hardware specific libraries include functions used to control the operation of hardware modules:
LIBRARY DESCRIPTION
ADC Library Used for A/D converter operation
CAN Library Used for operation with CAN module
CANSPI Library Used for operation with external CAN module (MCP2515 or MCP2510)
Compact Flash Library Used for operation with Compact Flash memory cards
EEPROM Library Used for operation with built-in EEPROM memory
Ethernet PIC18FxxJ60 Library Used for operation with built-in Ethernet module
Flash Memory Library Used for operation with built-in Flash memory
Graphic Lcd Library Used for operation with graphic LCD module with 128x64 resolution
I²C Library Used for operation with built-in serial communication module I2C
Keypad Library Used for operation with keyboard (4x4 push buttons)
Lcd Library Used for operation with LCD display (2x16 characters)
Manchester Code Library Used for communication using Manchester code
Multi Media Card library Used for operation with multimedia MMC flash cards
OneWire Library Used for operation with circuits using One Wire serial communication
Port Expander Library Used for operation with port expander MCP23S17
PS/2 Library Used for operation with standard keyboard PS/2
PWM Library Used for operation with built-in PWM module
RS-485 Library Used for operation with modules using RS485 serial communication
Software I²C Library Used for I2C software simulation
Software SPI Library Used for SPI software simulation
Software UART Library Used for UART software simulation
Sound Library Used for audio signal generation
SPI Library Used for operation with built-in SPI module
SPI Ethernet Library Used for SPI communication with ETHERNET module (ENC28J60)
SPI Graphic Lcd Library Used for 4-bit SPI communication with graphic LCD display
SPI Lcd Library Used for 4-bit SPI communication with LCD display (2x16 characters)
SPI Lcd8 Library Used for 8-bit SPI communication with LCD display
SPI T6963C Graphic Lcd Library Used for SPI communication with graphic LCD display
UART Library Used for operation with built-in UART module
USB HID Library Used for operation with built-in USB module

MIKROE

MIKROE is a development tools company dedicated to standardization and time-saving in the embedded industry.

  • About us
  • Success story
  • Contact
  • PressKit
  • Timeline
  • Partners
  • Legal
  • Distributors
  • Legacy Products

SOLUTIONS

  • Click boards™
  • Development boards
  • Mikromedia
  • CODEGRIP
  • NECTO Studio
  • Planet Debug
  • ClickID
  • Click Snap
  • EmbeddedWiki

SUPPORT

  • Helpdesk
  • Forum
  • Libstock
  • Learn
  • Let's Make
  • eBooks
  • Premium TS
  • Design service
  • Product Customization
  • Contract Manufacturing

STANDARD

  • mikroBUS™
  • mikroSDK
  • SiBRAIN
  • DISCON

Prodavnica za inostrano tržište

Nalazite se na prodavnici za inostrano tržište. Da li želite da Vas odvedemo na prodavnicu koja je namenjena za Srbiju?

Prodavnica za inostrano tržište

Nalazite se na prodavnici za inostrano tržište. Da li želite da Vas odvedemo na prodavnicu koja je namenjena za Srbiju?

Daily product releases, special offers, and more

  • FOLLOW US:

  • instagram
  • linkedin
  • facebook
  • github
  • newsletter
  • youtube
  • twitter twitter

Join us

Pridruži nam se

Careers
Internship
Posao
Napravi Click
Praksa
Copyright© 2025 MikroElektronika d.o.o.

Privacy