6.3 Writing your first program
Writing a program begins with New Project option from a File menu. In a message window that appears you need to select options as in picture below.
 Select a PLC controller by clicking on OK, and a program is ready to be used. It is recommended when you begin working that you write in a header a title of a program, author's name and inputs/outputs used. This may seem as a waste of time, but really isn't because this habit of writing comments will pay off in the future.
Program written here is just a basic program made for learning Syswin. Program can detect when a key has been pressed and can activate a relay at the PLC controller output. As long as the key is pressed down, a relay is active. Operation of a relay and a key can be followed via LED diodes on PLC controller housing. Writing a program begins with a click on the first icon to the left, recognized by two vertical lines. Icon beneath this one is similar to the first but for a slash. These two icons correspond with concepts normally open and normally closed contact which all instruction lines start with. You can select an option with an open contact by clicking on the first icon. When you click on the black rectangle to the right, a small window will appear where you need to write in the address of a bit a contact relates to.
It is very important to use addresses in a regular way when programming with SYSWIN. Addresses can have two parts, first refers to the word address, and the second to bit address in that word (both numbers must be separated by a period). For example, if address 200 is used, SYSWIN will interpret this as 2.00, and a zero bit whose word address is 2 will be called for. If you wish to access word 200 or its zero bit, you must use a call 20000, or better even 200.00. In this example address 000.00 is assigned for input address (key). This address represents a zero bit for word 000 from memory region IR. Simply said, it is an input screw terminal designated as 00 input. By connecting a key to it, and to one of the COMM terminal screws, a needed connection between PLC controller and keys is established.
Select a PLC controller by clicking on OK, and a program is ready to be used. It is recommended when you begin working that you write in a header a title of a program, author's name and inputs/outputs used. This may seem as a waste of time, but really isn't because this habit of writing comments will pay off in the future.
Program written here is just a basic program made for learning Syswin. Program can detect when a key has been pressed and can activate a relay at the PLC controller output. As long as the key is pressed down, a relay is active. Operation of a relay and a key can be followed via LED diodes on PLC controller housing. Writing a program begins with a click on the first icon to the left, recognized by two vertical lines. Icon beneath this one is similar to the first but for a slash. These two icons correspond with concepts normally open and normally closed contact which all instruction lines start with. You can select an option with an open contact by clicking on the first icon. When you click on the black rectangle to the right, a small window will appear where you need to write in the address of a bit a contact relates to.
It is very important to use addresses in a regular way when programming with SYSWIN. Addresses can have two parts, first refers to the word address, and the second to bit address in that word (both numbers must be separated by a period). For example, if address 200 is used, SYSWIN will interpret this as 2.00, and a zero bit whose word address is 2 will be called for. If you wish to access word 200 or its zero bit, you must use a call 20000, or better even 200.00. In this example address 000.00 is assigned for input address (key). This address represents a zero bit for word 000 from memory region IR. Simply said, it is an input screw terminal designated as 00 input. By connecting a key to it, and to one of the COMM terminal screws, a needed connection between PLC controller and keys is established.
 When you have written in 000.00, select OK, and first segment of the program will come up. Bit address will appear above the symbol with two vertical lines which refers to this bit, and a black rectangle will move one space to the right.
 First instructions up to the bus bar are called conditions because their execution activates instructions found to the right of the condition instructions. When a condition is entered, you also need to enter a corresponding instruction that is set off by an execution of the condition. In this example it is a relay controlled by a 00 bit in a word 010 of memory region IR. Output instructions are represented by a circle, or a circle and a line if we are dealing with a normally closed contact. By clicking on the icon with a circle, you select an output option with normally open contacts. Click on a black rectangle, and a contact window will come up where you need to write in the address for the output bit 010.00. Output of the IR region is found at address IR010, and first four bits of this word represent a relay within a PLC controller (if we are talking about a model CPM1A with relay outputs). Program done so far looks as in picture below.
 The basic functional entirety of some program is Network. Program consists of several networks found one below the other. Operations with these are found in Block option of the menu. Of all options, two basic ones, Insert network and Delete network are used the most. Other makers for PLC controllers use different concepts such as Rung instead of the term Network. Simply said, we are talking about a PLC program sequence which has one or more executing instructions, and along with END instruction can make up one correct PLC program. As the first network in a program is already in use, the next one has to be added. Adding a Network is done with Insert network command from a Block menu.
 When selecting this option, a small window appears where you need to select whether a new network will appear above or below the existing one.
 In our case you should choose the second option and click on OK. Following this, a new network appears as in picture below.
 Last network in every program must contain END instruction. Since this is a simple example, second network is also the last. End instruction is found among the functions. In order to come to it, you need to click on FUN icon following which a window as in picture below will come up.
 END instruction can be obtained either by writing in "END" in newly obtained window or by clicking on Select which gives all PLC controller instructions sorted by the regions as in the following picture.
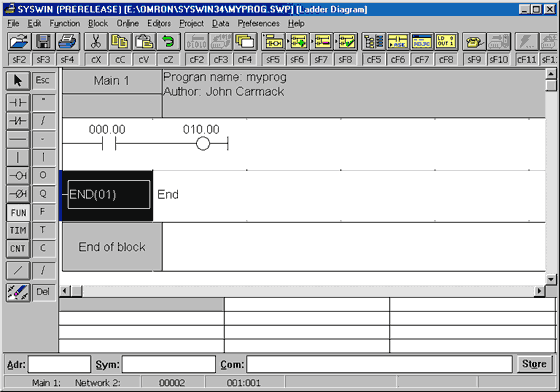
 By entering the END instruction your writing of a program is finished. Finished program looks as in the following picture.